Did you know that Facebook can help your business get more customers in the door? Yep, it’s true! By adding a Facebook Book Now button to your business page, you can make it super easy for people to book Facebook appointments and reservations with you.
In fact, it’s a great way to drive more traffic and boost your bookings! In this article, we’ll show you how to set up the appointment action buttons on your Facebook page and how to manage the Facebook appointment booking system. Let’s get started!
What is Facebook Appointment Booking?
Facebook’s appointment scheduling feature allows businesses to offer customers the convenience of booking appointments directly from their Facebook page or advertisements.
By adding a “Book Now” button to their Facebook page, businesses can enable customers to book appointments with ease.
The Facebook Book Now button is located directly below the business’s profile cover image, making it highly visible and accessible to customers. It is important to note that Facebook appointments can only be added to a business page and not on a personal profile.
Why Should You Get A Facebook Book Now Button?
If you’re looking to expand your customer base, integrating your scheduling software with Facebook can be a valuable step. By adding the Book Now button to your Facebook page, customers can immediately book your products or services without leaving your profile.
Here are some benefits of the free Facebook appointment booking tool:
- It’s free: All businesses can use Appointments on Facebook tools without any cost.
- Save time: Facebook appointments eliminate the need for extra time spent managing your calendar. You can now accept appointments from new and returning customers with less communication.
- Strengthen online presence: By letting customers book appointments and engage with you directly on Facebook, you’re not just keeping up with the times, but also attracting more traffic to your services. And with over 2.8 billion monthly users, Facebook is the ultimate spot to get noticed – so seize the opportunity!
- Increased customer conversion: By providing an easy and convenient way for Facebook visitors to schedule appointments, you can increase the likelihood of converting them into customers.
- Improved customer loyalty: Younger generations, such as Millennials and Gen Z, value technology in their shopping experiences. By making your services accessible through social media platforms, you can enhance your brand image and impress these younger demographics, leading to increased customer loyalty.
When considering adding a Facebook Book Now button or Reserve action button, it’s important to keep in mind that you can only have one action button at a time. If you choose to use a booking button, you won’t be able to include another button that promotes emails, messages, sales in your Facebook shop, or other common objectives.
Before implementing a booking button, it’s essential to carefully examine your business goals. If another objective is more important, consider using a different button instead. Switching to another action button can be done easily and quickly, so you can always test and make adjustments as necessary.
How to Set Up Facebook Appointments?
1. Add Book Now Button
To start setting up the Facebook appointment booking system, change your Facebook profile to your business account. Next, go to your Facebook business page.
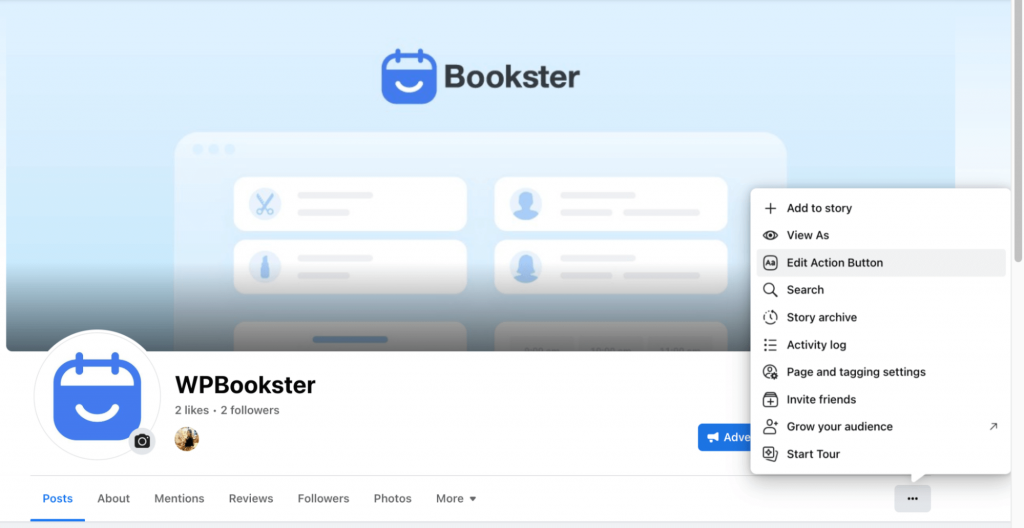
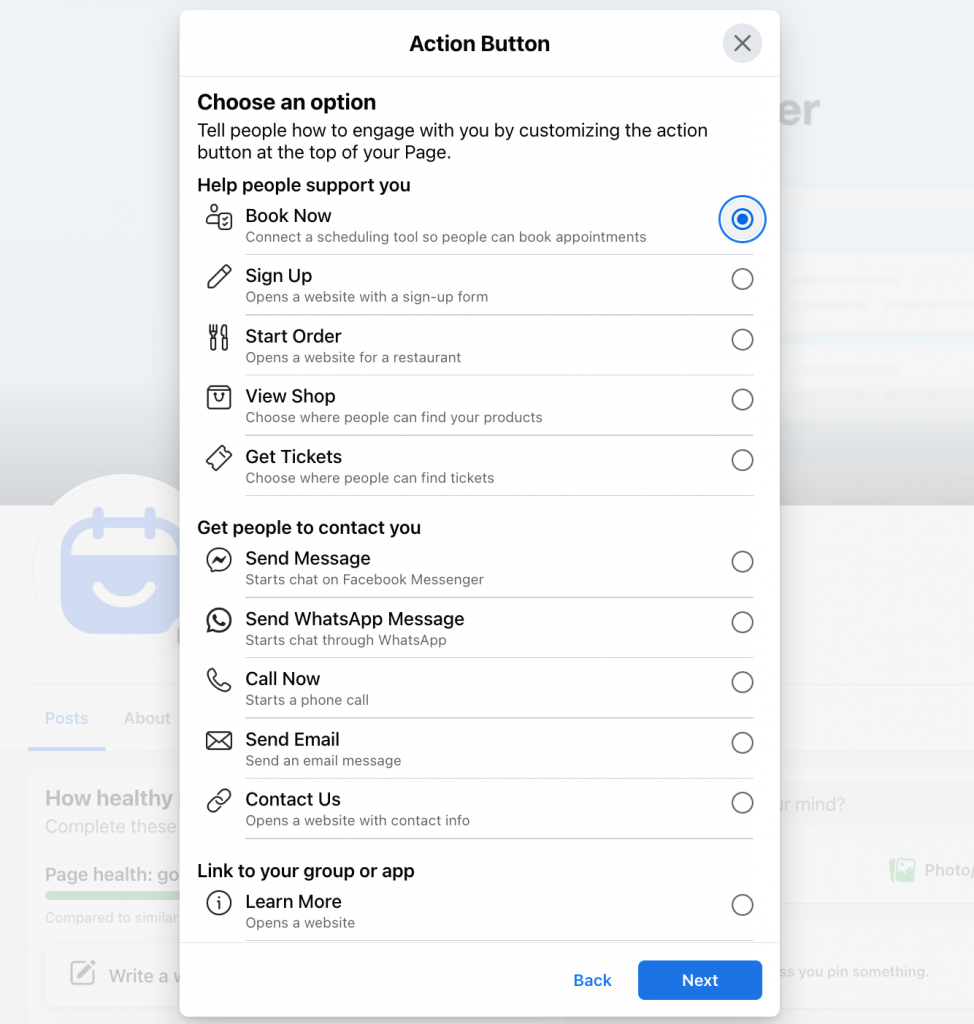
Click on the three dots located in the upper-right corner just below the Edit button. From the menu, choose Edit Action Button.
To configure a new action button, simply click on the “Change” button and select the desired option from the available choices. Here you choose Book Now option.
2. Choose Booking Tools
After selecting “Book Now“, you have the option to either link a third-party booking tool or utilize Facebook’s built-in scheduling tool.
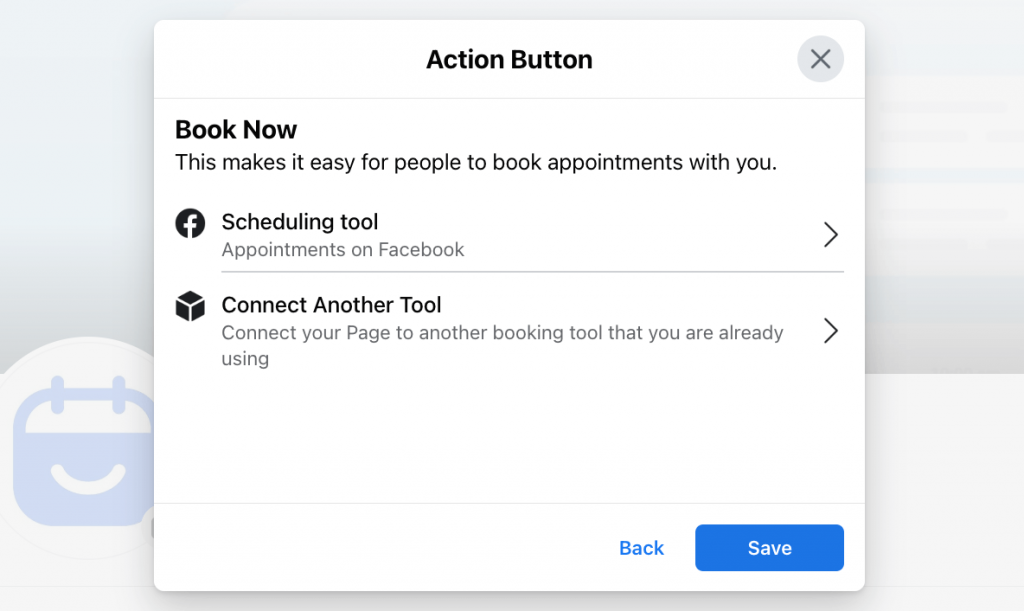
- If you opt for a third-party tool, you can easily link it to your Facebook account and set up your appointments using the external platform.
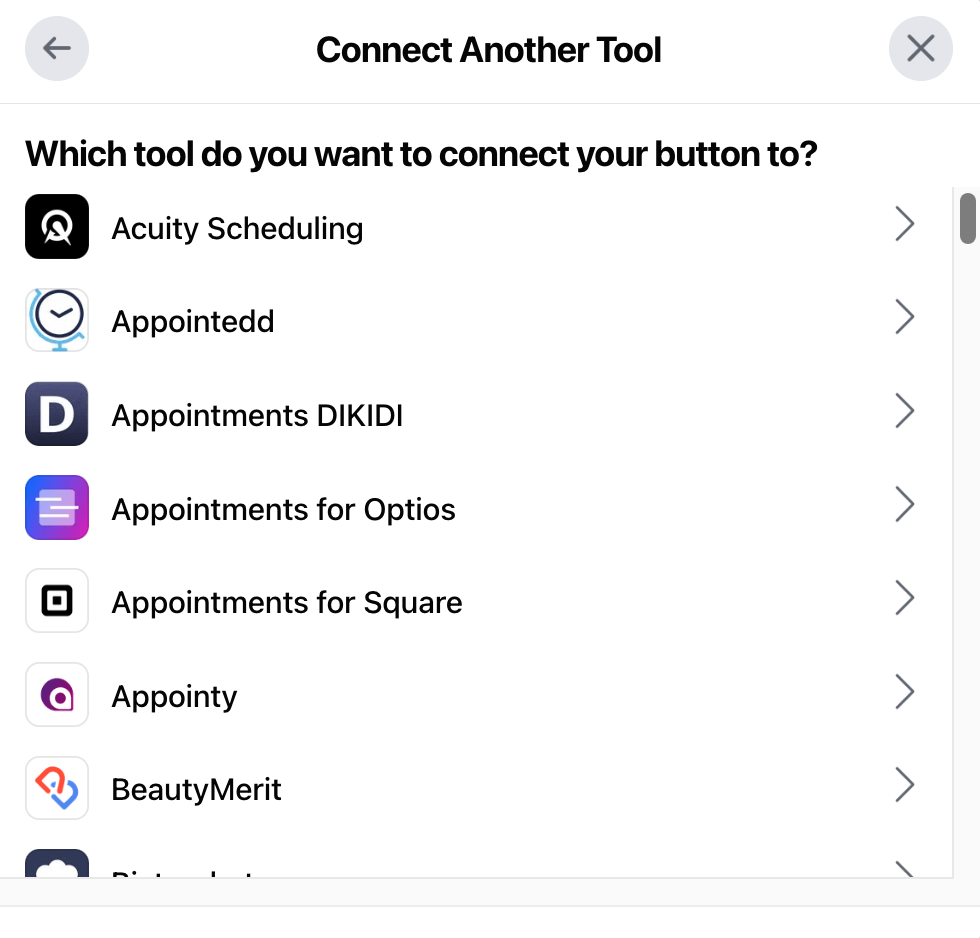
- If you are looking to improve the process of booking appointments, you can set them up directly on Facebook for a smoother experience by choosing the Scheduling Tool option and then following the next steps below.
3. Edit Availability
From the Scheduling Tool, click on Edit Availability. After that, you can enter your standard weekly schedule.
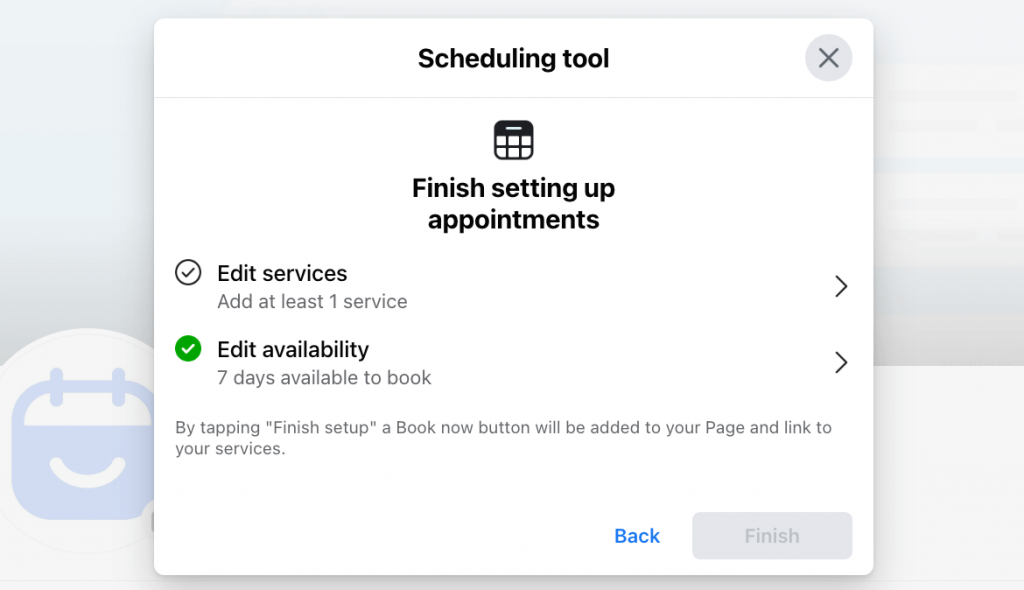
If you prefer to review and approve appointments through Messenger, simply toggle on the Manually Approve Appointments option.

4. Add Services
To add the services you offer to customers, navigate to the Edit Services section and click on the “Add a Service” button. Here you’ll be able to create a description of your service, add an image, set a price, and specify the timeframe for each service.
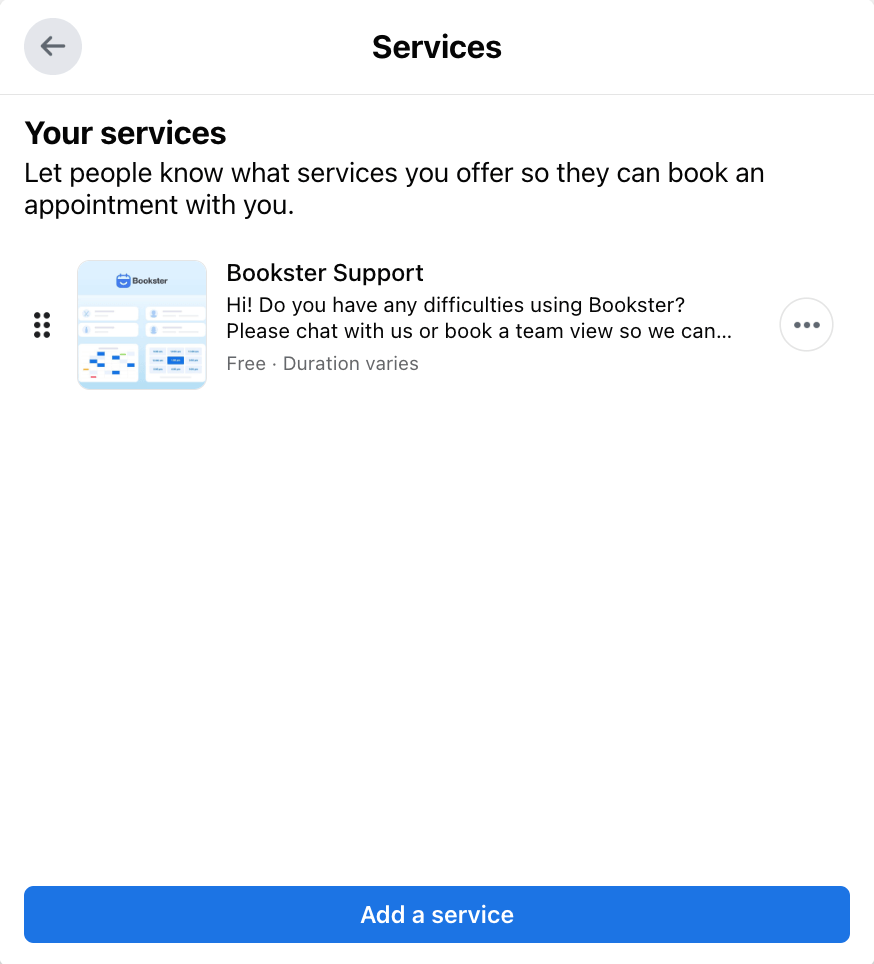
You can add as many services as you’d like, and once you’re finished, simply click “Finish” to complete the setup process.
Read more: 5 Steps to Streamlining Your Salon Business Booking System
How to Add New Facebook Appointments?
We will begin by discussing how customers can book appointments through your Facebook page and the steps involved in confirming those bookings. We will also guide you through how to manually add appointments with your customers.
Customers Booking
If you’ve turned on Show available appointments in your Page’s appointment settings, people can see your business’s availability and book an appointment with you automatically from your Page.
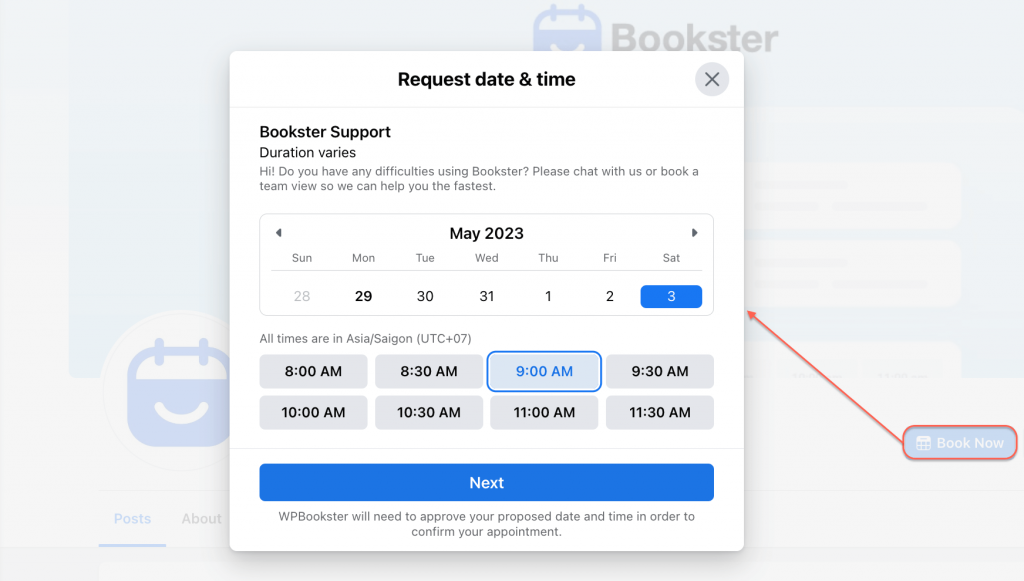
If you’ve turned off Show available appointments, people will be able to message you with a request for an appointment. You can either confirm the appointment in Messenger, or you can manually add an appointment on the Appointments tab of your Page.
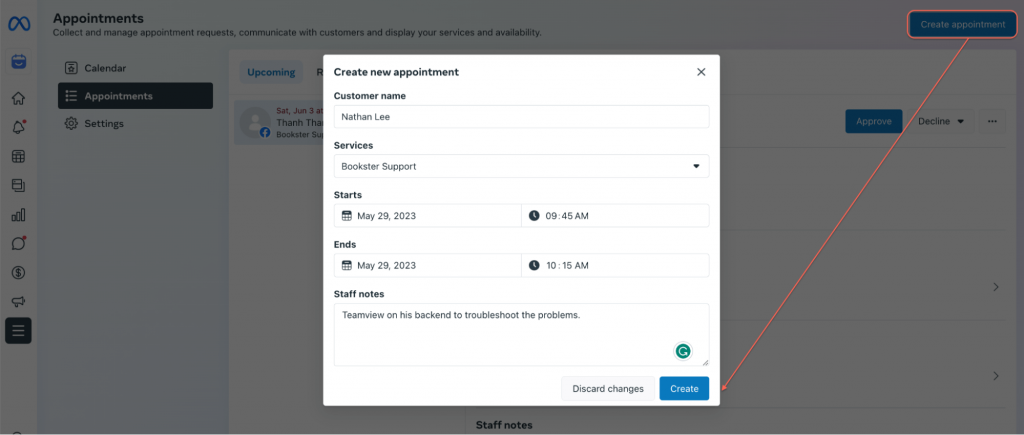
Manually Add Appointments
- From your page, go to the Professional dashboard in the left menu of your Page
- Click Appointments from the tab Your tools.
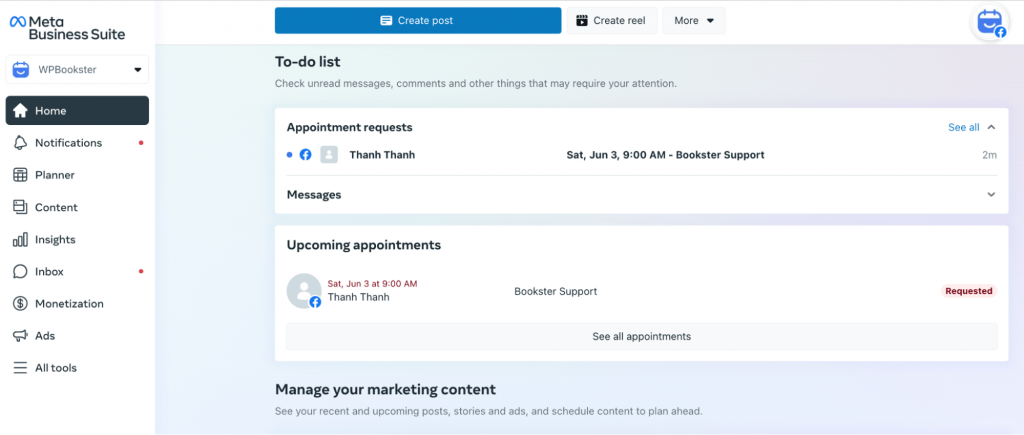
- Now you automatically switch to Meta Business Suite. Click on See all appointments in Upcoming appointments section.
- Click Create Appointment and fill in details about the appointment.
Read more: 4 Best WordPress VR Plugins to Encourage Appointment Booking
Confirm Your Bookings
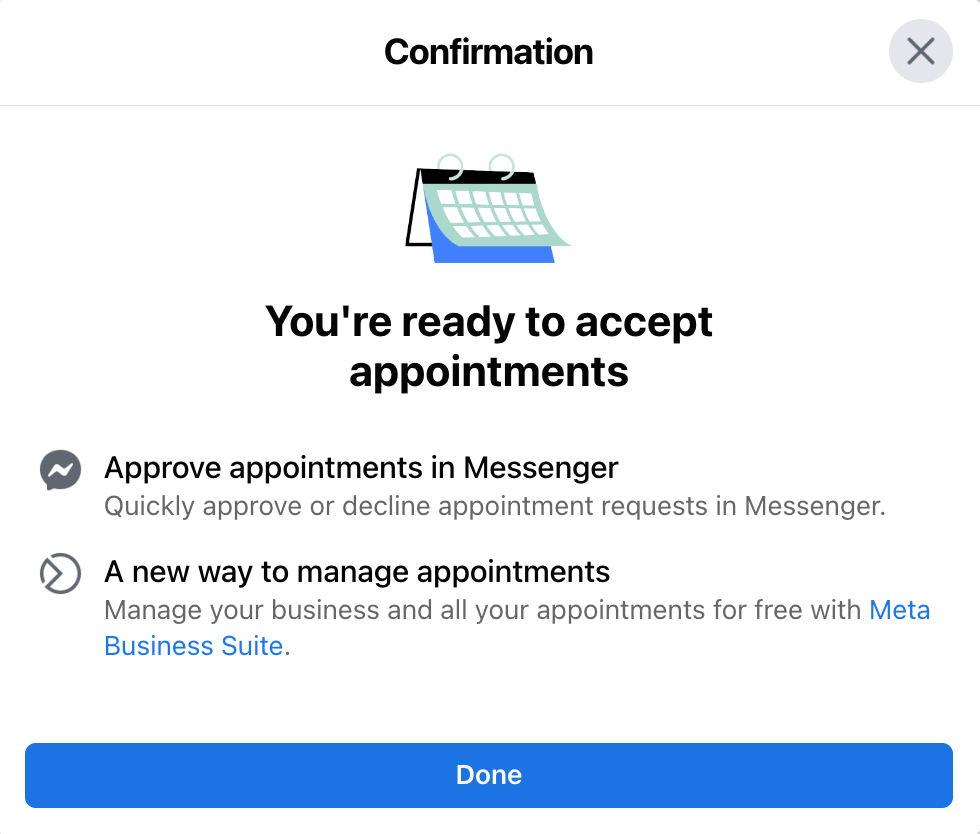
If you have chosen to manually confirm your bookings, you can easily manage them through Messenger. Once a customer requests an appointment slot, you will receive an automated appointment request in your Business Suite inbox.
You can then choose to accept or decline the request and, if you confirm, Messenger will automatically book the appointment for you.
To manage your appointments efficiently, simply click on “View Details” to add any internal notes or to cancel the appointment. If you choose to decline the appointment, Messenger will automatically create a message for you to send to the customer.
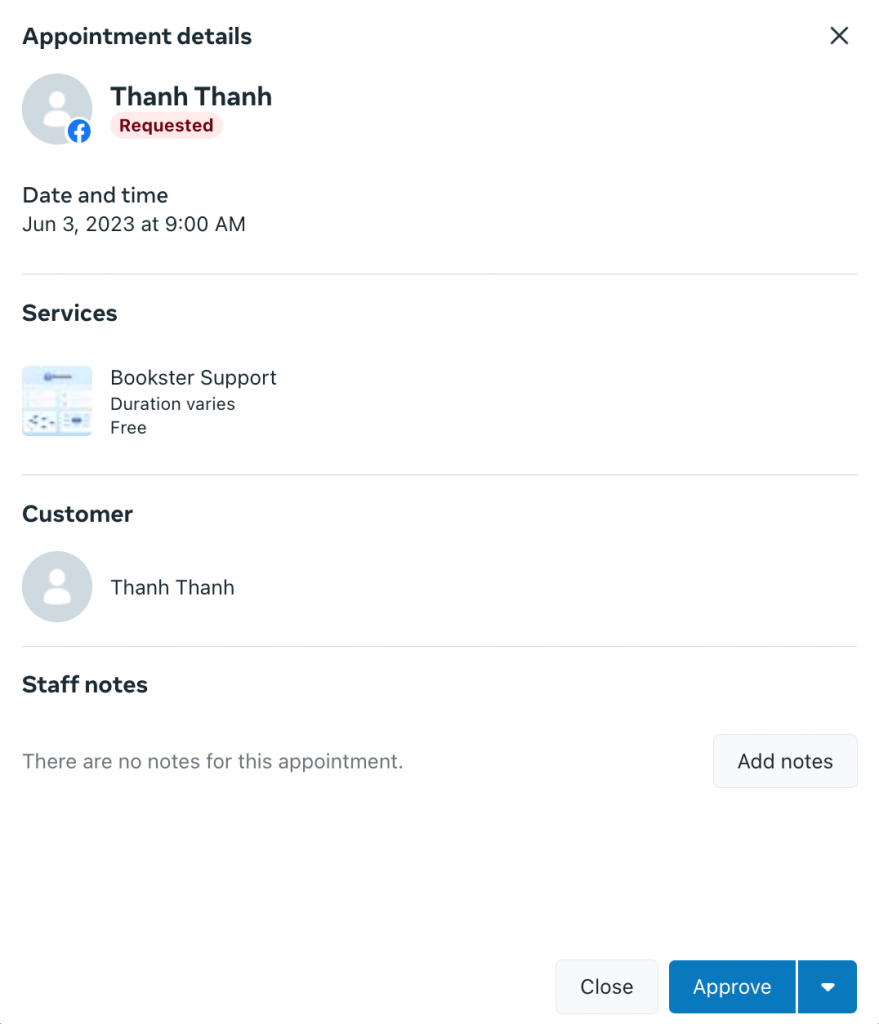
This feature allows you to manage appointments quickly, and you can edit the generated message before sending it to ensure it meets your needs.
How to Manage All Facebook Appointments
Monitor Your Booked Appointment
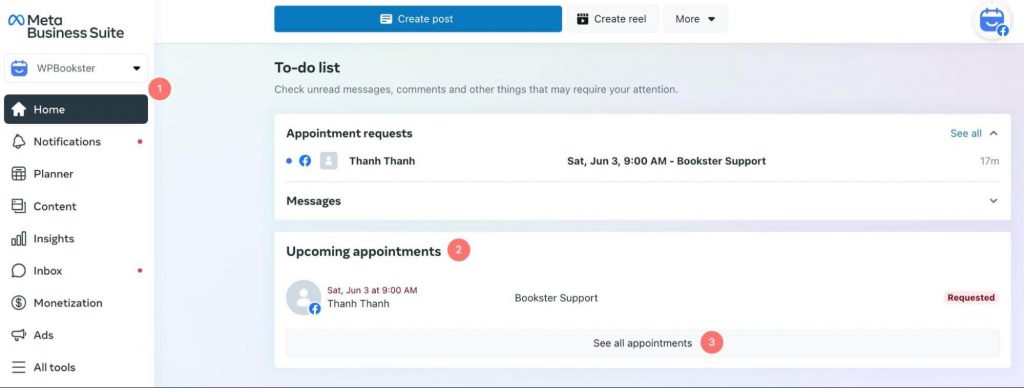
To change your settings for your available Facebook appointments, services list, and appointment messaging:
- Go to Appointments in Meta Business Suite.
- Click on See all appointments in Upcoming appointments section
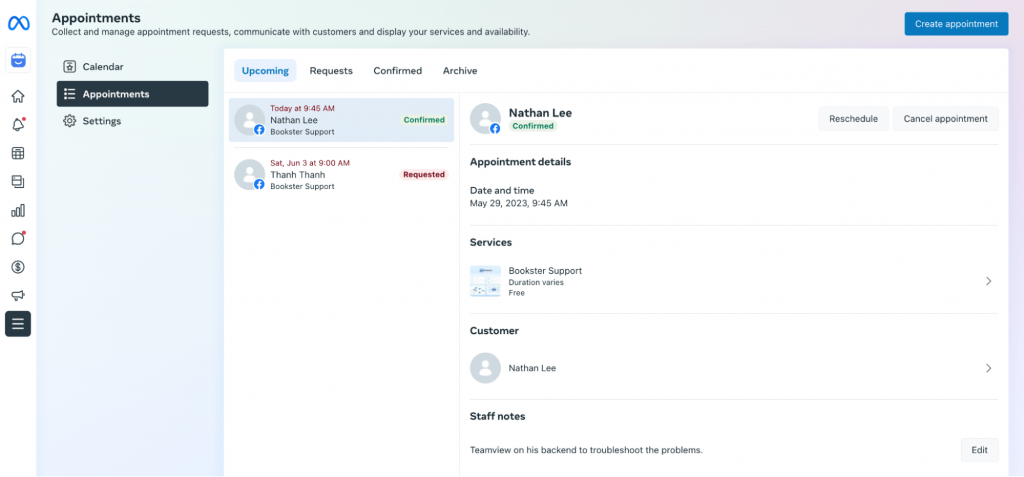
On this page, you have the option to customize how your Page displays appointment availability, appointment durations, and customer reminders, among other features.
Manage Facebook Services
To manage your offerings in Business Suite, simply follow these steps.
Edit Existing Services
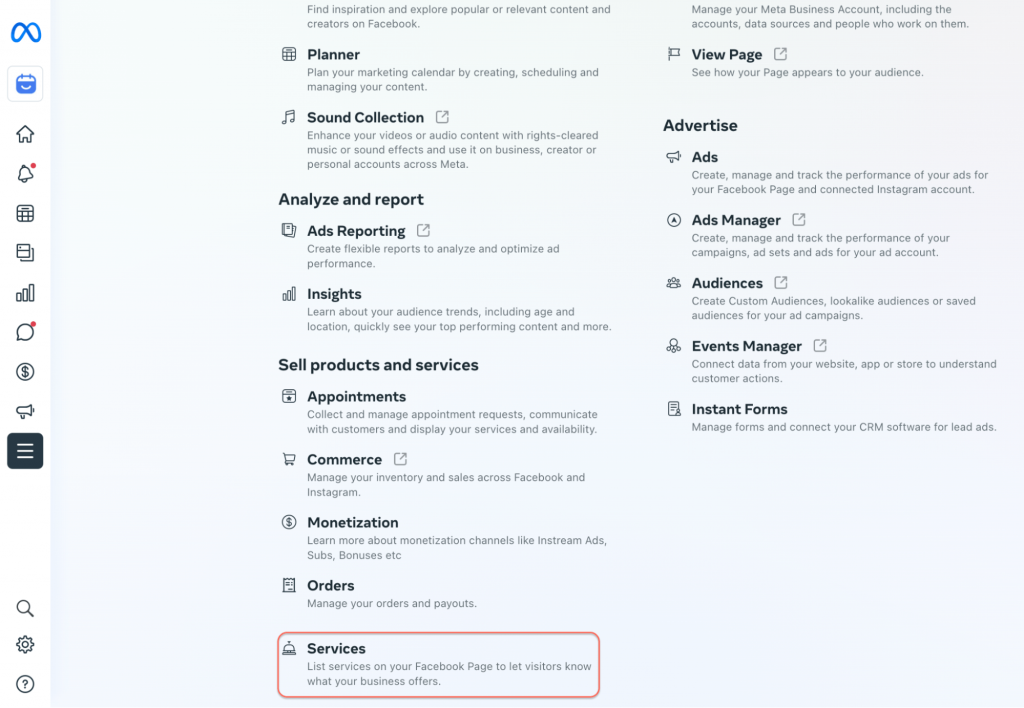
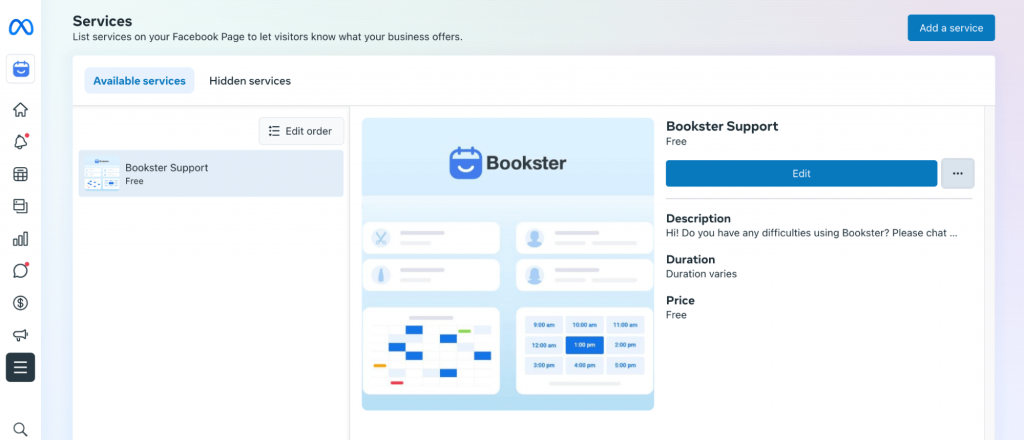
First, open the All Tools menu and select Services. From there, you can review all of your existing services.
To make changes such as editing, adding or removing services, simply click the Edit button. You can also adjust the pricing or time for each service.
Add new services
To add a new service to your range of offerings, follow these simple steps. First, locate the Add a Service button situated in the upper-right corner. Next, provide a detailed description of the service, set a price for it, and upload a relevant image. Lastly, you can utilize the Edit Order button, which can be found in the upper-left corner of the screen, to prioritize your newest services or display them based on pricing or other attributes.
Send Reminders to Customers
Business Suite offers a Calendar tool that simplifies appointment tracking for your team. Additionally, by enabling the Reminder feature, you can ensure that customers remember their Facebook appointment booking too.
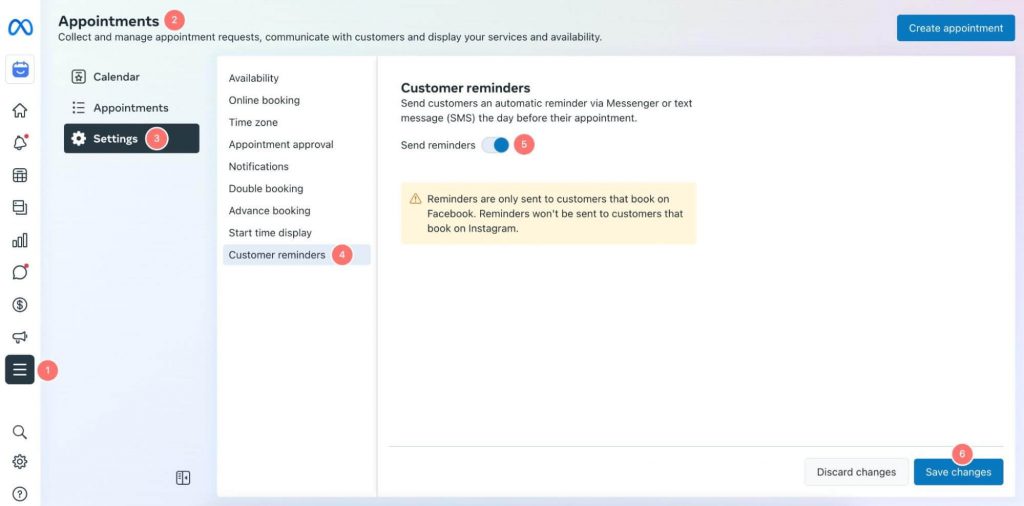
To activate this feature, navigate to the Appointments panel and click on the Settings tab. From there, select the Customer Reminders option and toggle it on. This will automatically send reminders to customers via Messenger one day prior to their scheduled appointment.
FAQ about Facebook Appointment Booking
1. Can I sync Facebook appointments with Google Calendar?
Yes, you can sync your Facebook appointments with Google Calendar by managing it from your Page or profile in professional mode on Facebook. When your Facebook appointments Google Calendar is synced, you will easily view all of your appointments in a simplified calendar format and avoid manually adding them.
Additionally, this feature automatically blocks off your Facebook calendar when your Google Calendar shows that you’re busy. This feature prevents customers from booking appointments during times when you’re already booked or have designated as personal time.
2. Facebook booking appointments not working: What should I do?
If you are experiencing issues with booking appointments on Facebook, the problem may be due to the transition from Classic Pages to the new Pages experience.
To set up the appointments feature on your new Page, you’ll need to switch back to Classic Pages. Then go to the Manage Page menu and select the Appointments tab. If the tab isn’t visible, select Edit tabs and Add a Service.
It’s important to note that switching back to Classic Pages will result in the loss of any content you’ve posted on the new Pages experience. Your content will be restored once you return to the new Pages experience.
Once you have set up appointments with classic Pages, you can go back to new Pages. Here you create and manage appointments from Meta Business Suite. Keep in mind that your customers can still book appointments directly from your new Page, but the layout may be different.
3. Can I integrate Facebook appointments with WordPress?
Yes, it is possible to integrate Facebook appointments with WordPress. You can conveniently book and manage your appointments from Facebook using WordPress. To establish the connection between the two platforms, you can use either a WordPress or Facebook plugin.
Conclusion
In conclusion, Facebook appointment and reservation buttons bring a seamless booking experience and offer service-based businesses a more specific call-to-action option. Whether you intend to focus on organic content or use ad spend for promotions, these Reserve and Book Now buttons hold significant potential to help marketers achieve their objectives.
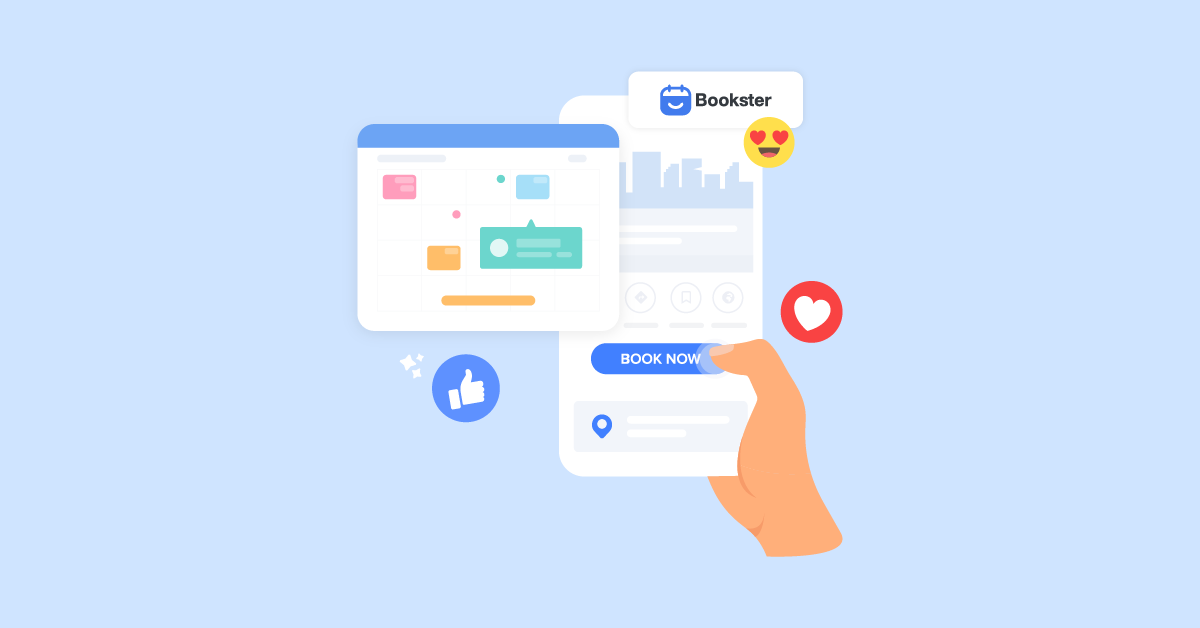
If you want to enable your customers to book on your website, especially for complex customization and appointments that come with a cost, you’ll need a reliable and effective tool. Why not give Bookster – WordPress Appointment Booking Plugin a try? It’s trustworthy and excellent at what it does!