Did you know Google Calendar has updated an awesome Free feature that lets you create a page where people can book appointments with you? Thanks to Google appointment schedule, you just choose the dates and times you’re available, and anyone with an email address can select a time slot that works for them.
And the best part? You can even embed the Google Calendar booking page on your WordPress site without downloading any calendar booking plugin. This is especially great for business websites that provide services, training, or anything else that requires booking a session to boost pre-sales.
In this article, we’ll walk you through the simple steps to create and add Google appointment schedule to your WordPress booking page. It’s super easy and you’ll be up and running in no time!
Table of Contents
What is Google Calendar Booking Page?
Google Calendar booking page is a page that lets you easily keep track of your availability and allows anyone to book time with you directly through your personal page.
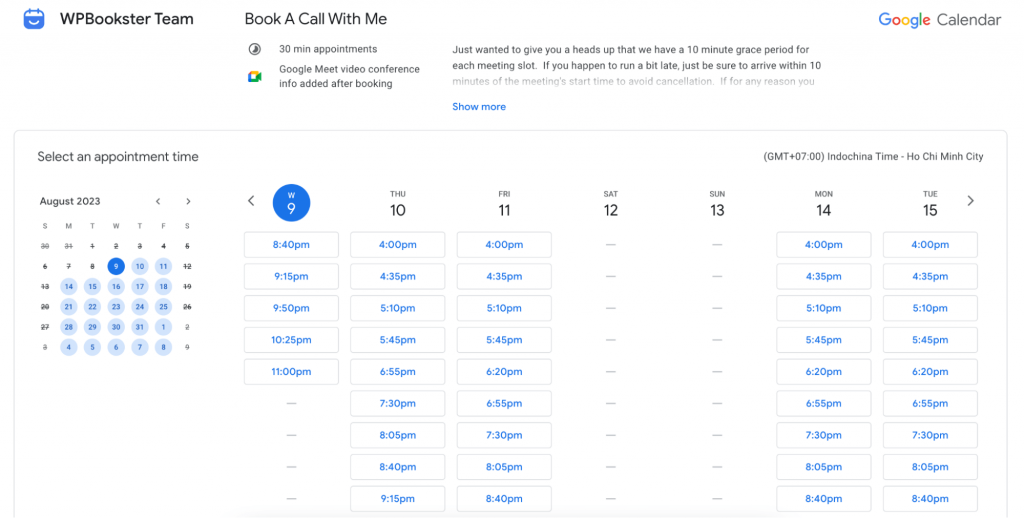
Here are some of the benefits you can expect:
- Your own professional booking page, with different appointment options that make it easy for anyone to schedule time with you (all they need is an email address!)
- Booking confirmation and update emails keep you and your clients on the same page, and automatic reminders help ensure everyone shows up on time
- You can choose how to meet with your clients, whether in person, over the phone, or via a Google Meet link
- Customized availability options let you set limits on the number of appointments per day, appointment windows, buffer times in between, and more.
Why should add Google Calendar booking page to WordPress?
It’s a great option because it’s totally free and super easy to set up. Plus, there’s no need to download or configure any plugins.
Since most people already have a Google account, it’s a user-friendly option for your potential clients.
By seamlessly integrating your WordPress site with your Google Calendar, you can manage your meetings with ease. And, if your calendar is up-to-date, your busy schedule will show in real time, preventing any double bookings.
4 Steps to Add Google Appointment Schedule to WordPress
The first 3 steps will guide you on how to create appointment scheduling on your Google Calendar, and the 4th step will show you how to embed it into your WordPress site. Let’s get started!
1. Create Appointment Schedule Slots
- Open up Google Calendar on your computer.
- Click on the “Create +” button located at the top left-hand corner.
- From the drop-down menu, select “Appointment Schedule”
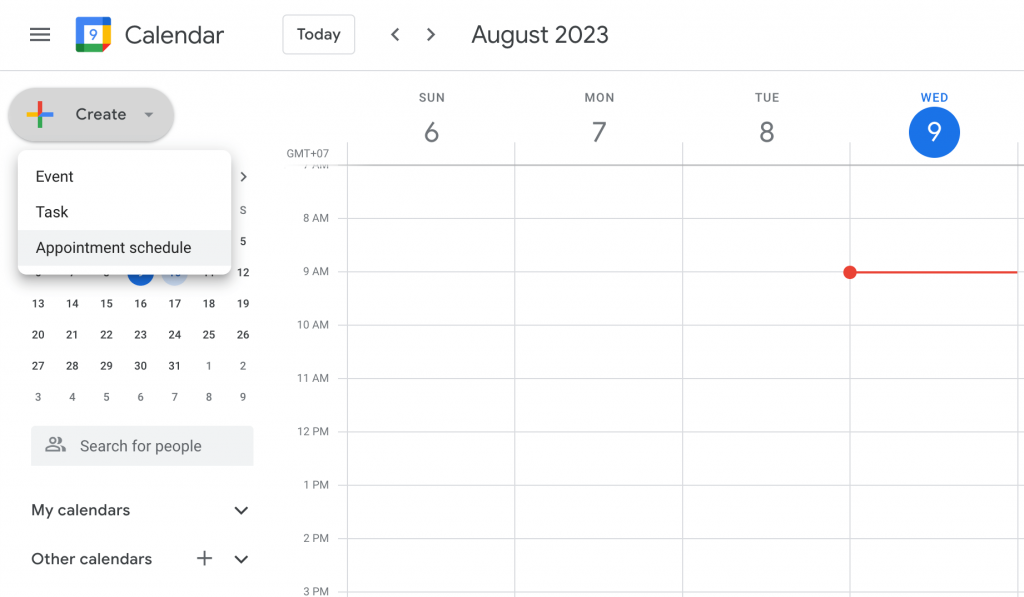
After that, an appointment schedule setting navigation bar will open for you to customize the scheduling.
- Give your schedule a title.
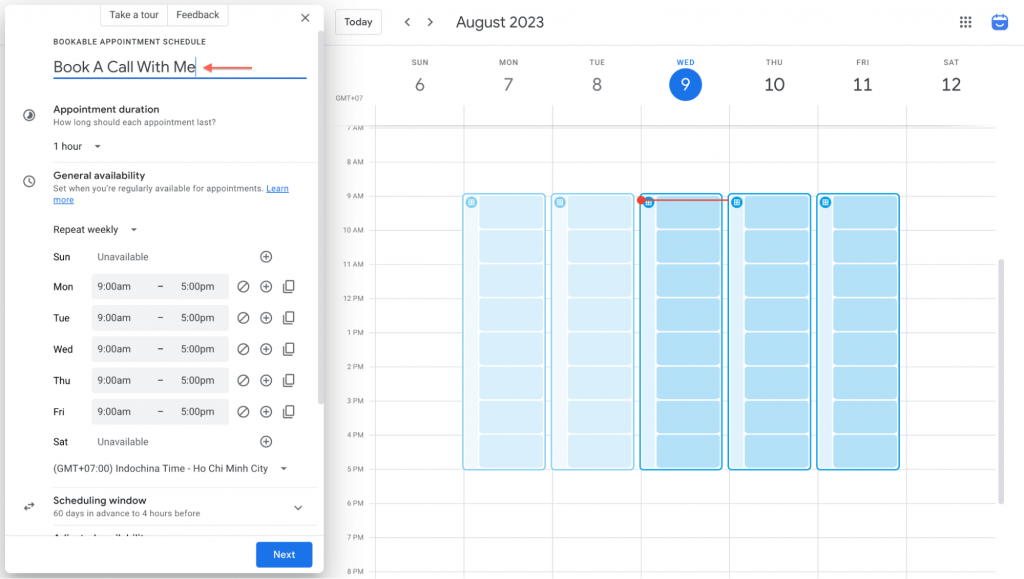
Remember that this title will be visible to anyone who has access to your booking page and will also appear on your calendar.
2. Set Up Google Appointment Schedule
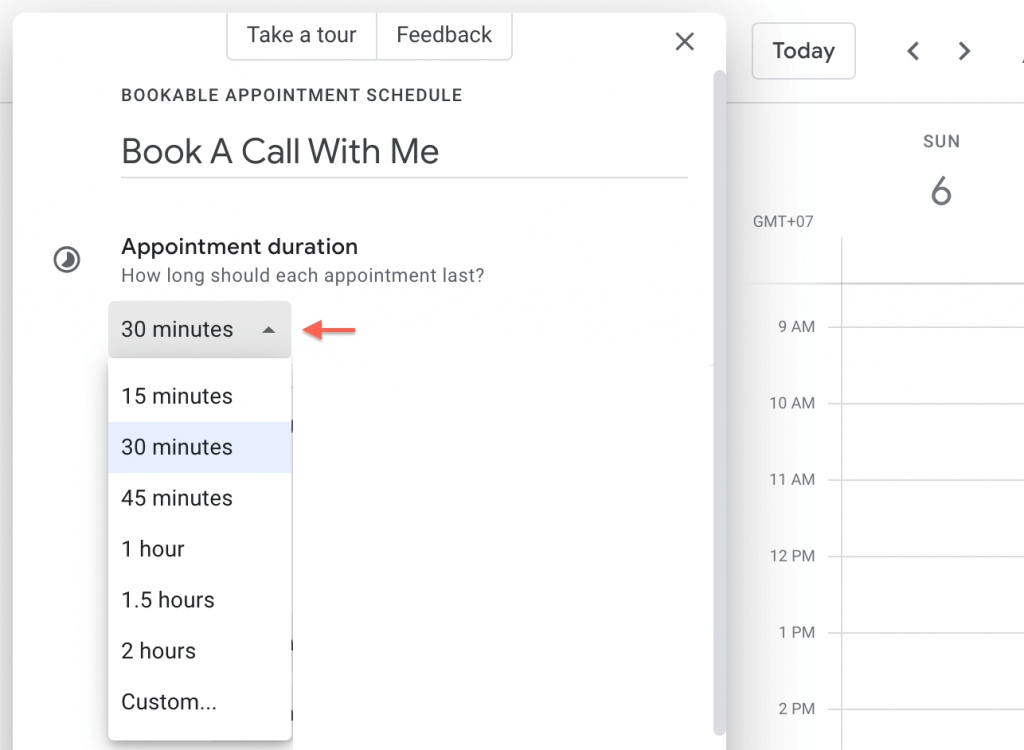
Step 1: To set an Appointment duration, click the down arrow.
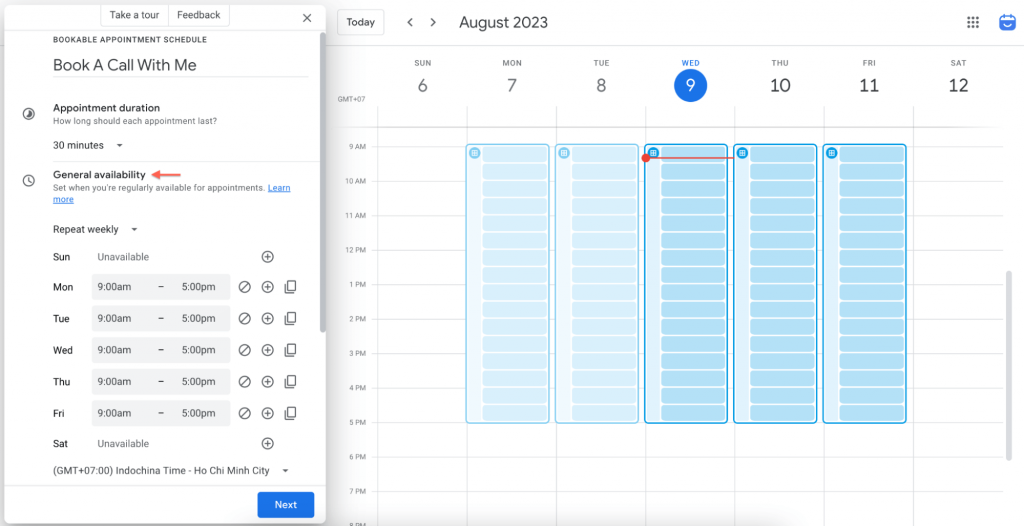
Step 2: In General availability, set the available date, time, and time zone of your appointments.
You can even set up appointments that repeat on a regular schedule! If you need to add multiple time slots for the same day, just click “Add another period to this day“
Step 3: Customize optional settings
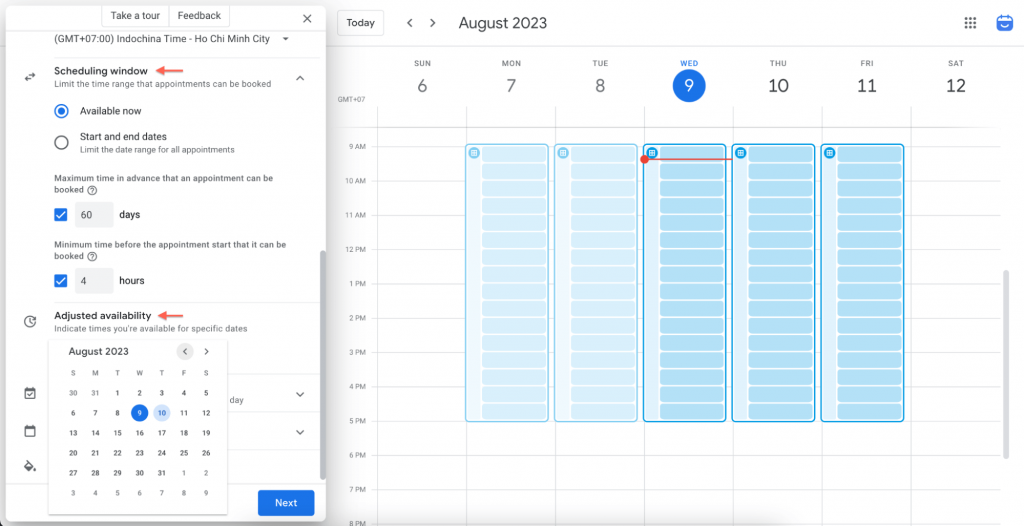
- If you want to adjust how far in advance people can book appointments with you, just click on the arrow next to the “Scheduling window“.
- And if there are specific dates when your availability will be different than usual, you can customize Adjusted availability too.
- In the Booked appointment settings, you can choose the Buffer time between appointments and the maximum number of bookings you want to accept per day.
- If you have other calendars you subscribe to, you can choose the Calendars check your availability by selecting the corresponding boxes.
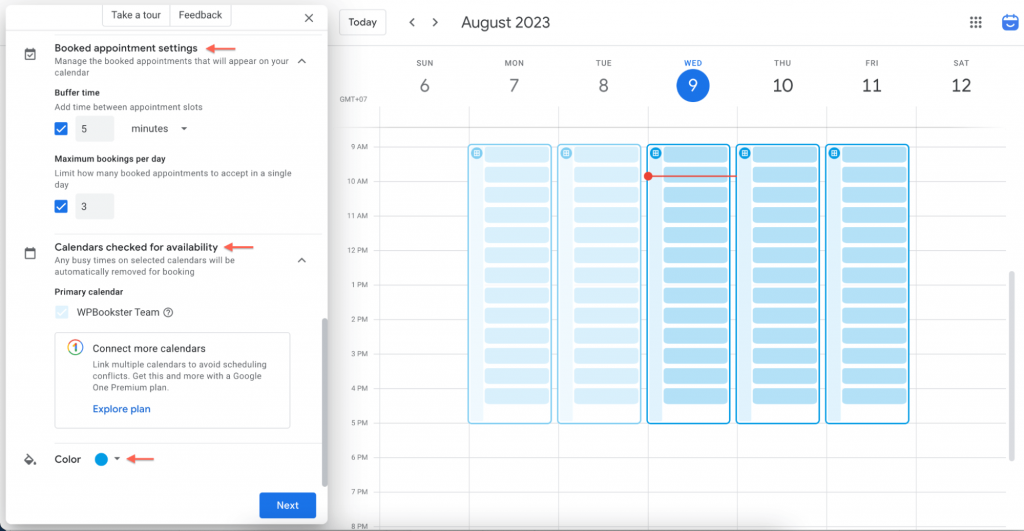
- You can choose a Color for your appointment schedule too.
Step 4: Complete this stage by clicking Next to move on to the Google Calendar booking page settings.
3. Customize Google Booking Page
In this step, let’s make sure everything looks great on your booking page.
- First, take a look at your photo and name and make sure they’re just the way you want them.
- Then, choose your Location and conferencing options. You can pick from Google Meet video conferencing, an in-person meeting, or a phone call, or you can leave it blank for now and decide later.
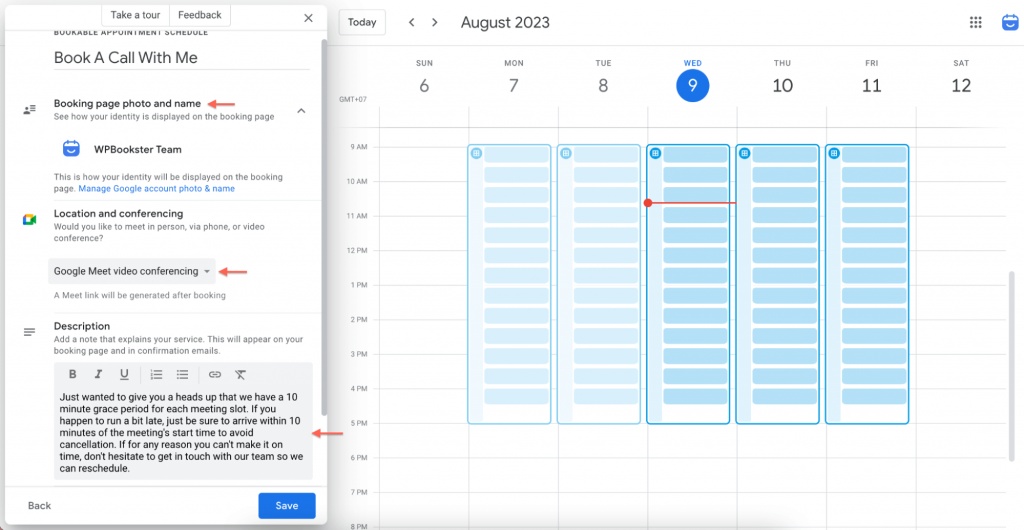
- Add a Description of your services so your clients know what to expect. This will show up on your booking page and in confirmation emails.
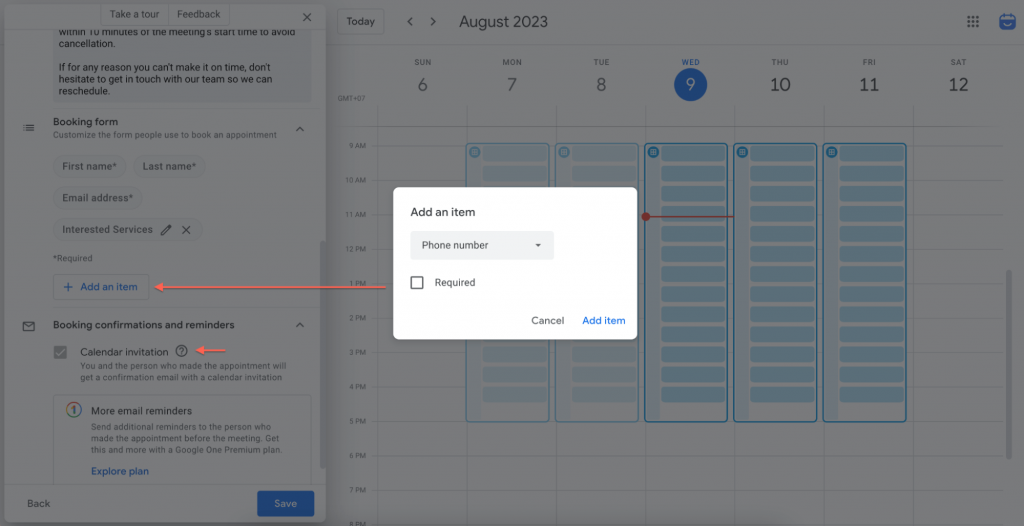
- Make sure to include fields for your attendees to fill out in the Booking form, such as their first and last names, and email addresses. To add more fields, simply click “Add an item” and choose either Phone Number or Custom Item.
- If you want to take payments for appointments, you can connect your Stripe account to Google Calendar and check the box next to “Require payment when booking“. You can also enter the amount and currency you want to charge, and add your cancellation policy.
- Set up Booking confirmations and reminders for your appointments. You can even send up to 5 reminder emails to make sure everyone is on the same page.
- Click Save.
It’s time to see what your booking page will look like to your potential clients and share it on your WordPress website. So, let’s hope on step 4.
4. Embed Google Calendar booking page to WordPress
1. First, open your Google Calendar and look for the appointment schedule icon on your calendar grid.
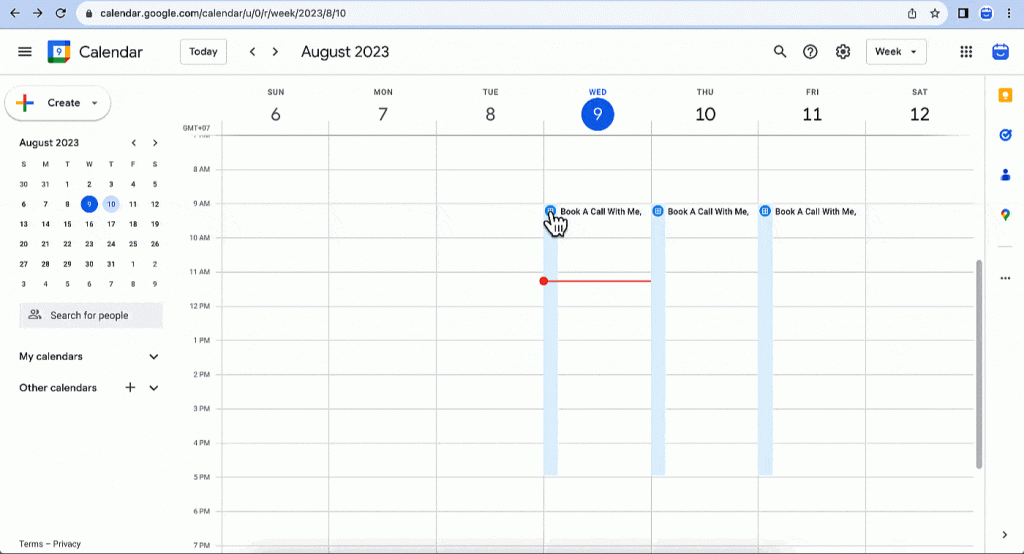
2. Click on the “Share” button that’s located on the right side of the “Open booking page“.
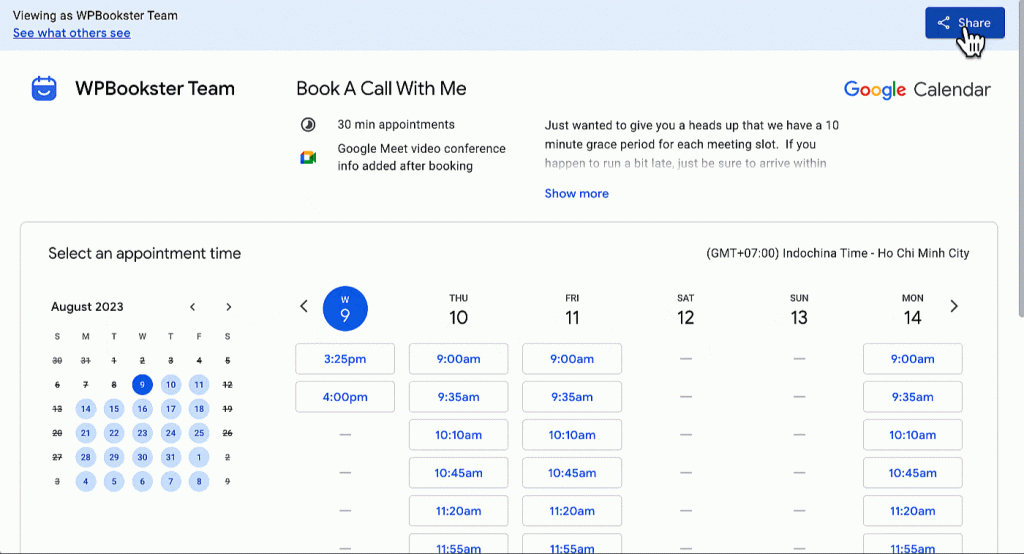
3. Next, select the “Website embed” tab. You’ll see two options for adding an appointment schedule button or embedding the booking page to your website.
4. Copy the code that’s provided and then go to the page or post where you want to display your calendar.
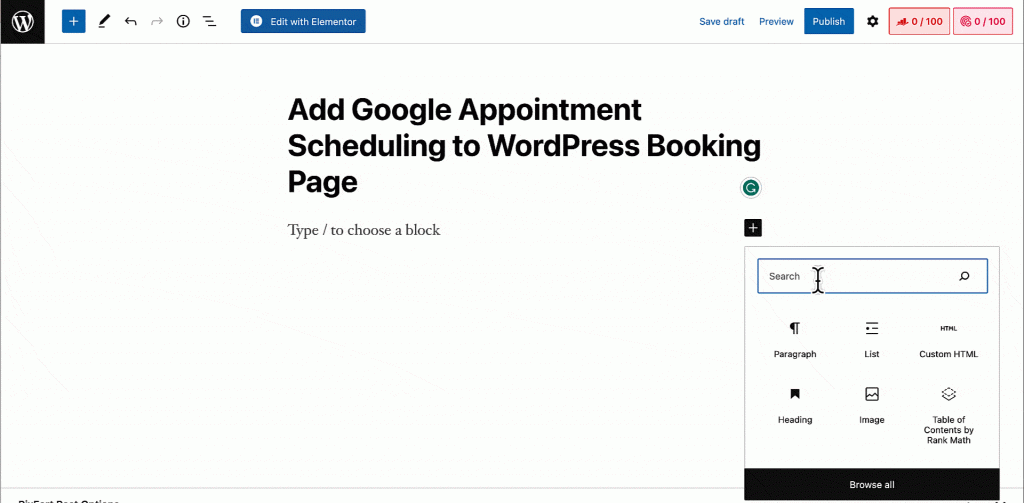
- If you’re using the Gutenberg Editor, insert a Custom HTML block and paste the code in there.
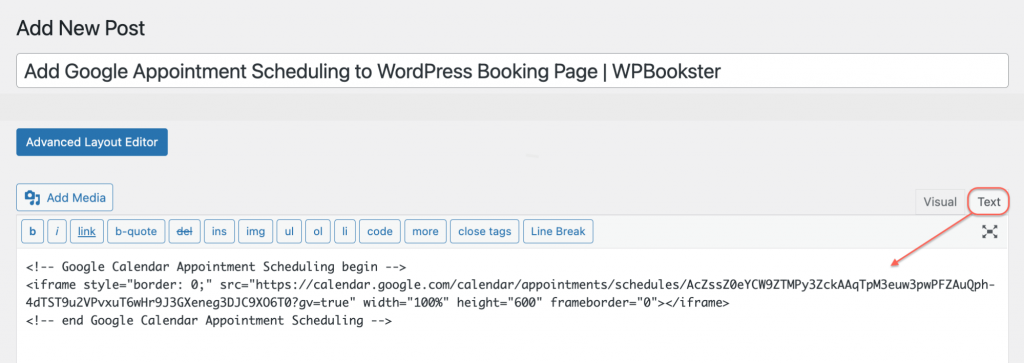
- If you’re using the Classic Editor, switch to the text editor and paste the code directly.
Once you’ve added the code, publish your post or page and preview it to see your Google Calendar in action! It should look something like the image below.
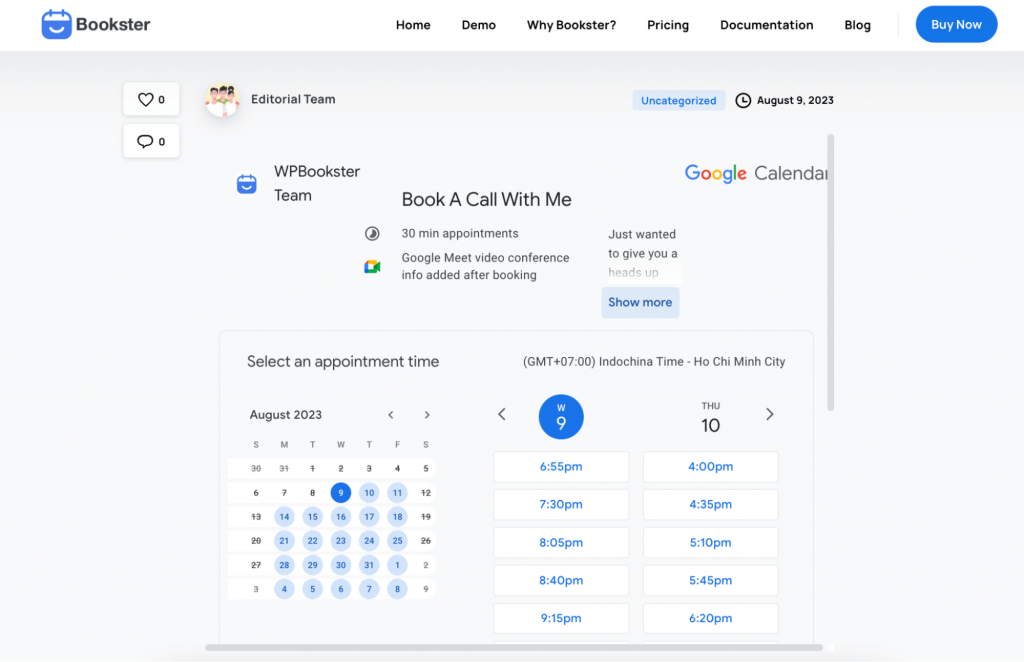
How Google Appointment Schedule Works on WordPress Page
Let’s walk through how Google Appointment Schedule works on a WordPress page.
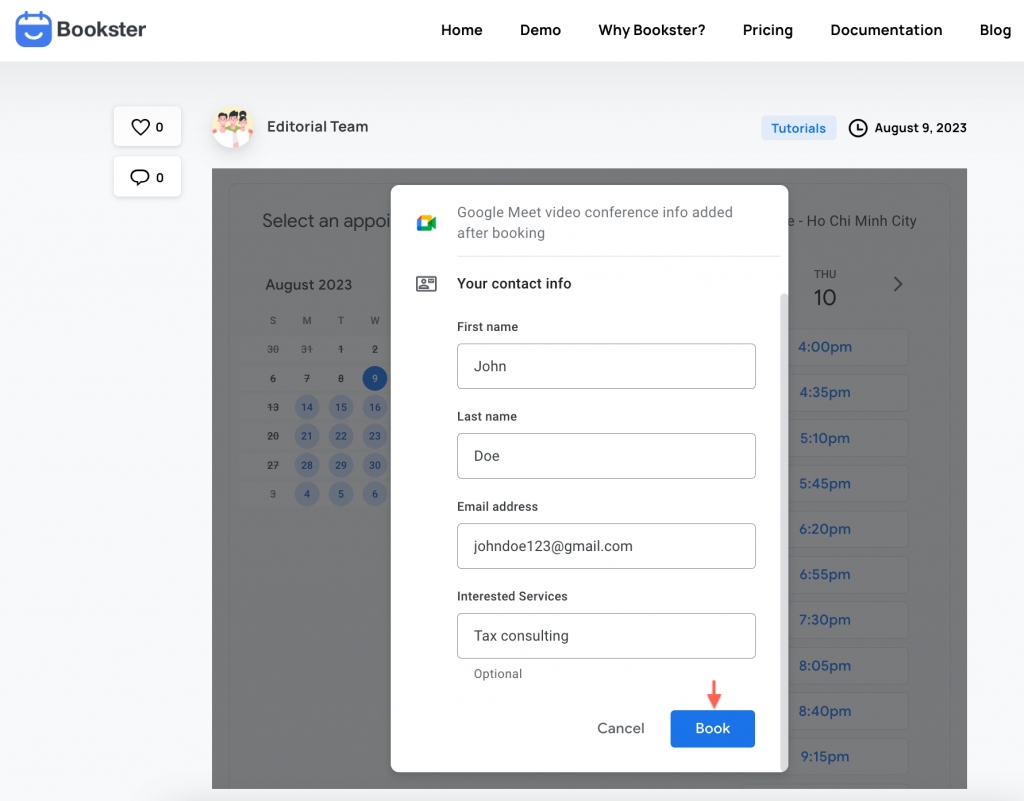
First, I’ll select a time slot on the embedded Google Calendar booking page. In the pop-up, you’ll see all the contact info details and descriptions you’ve set up. Don’t forget to fill in all the required fields and add the purpose of the meeting.
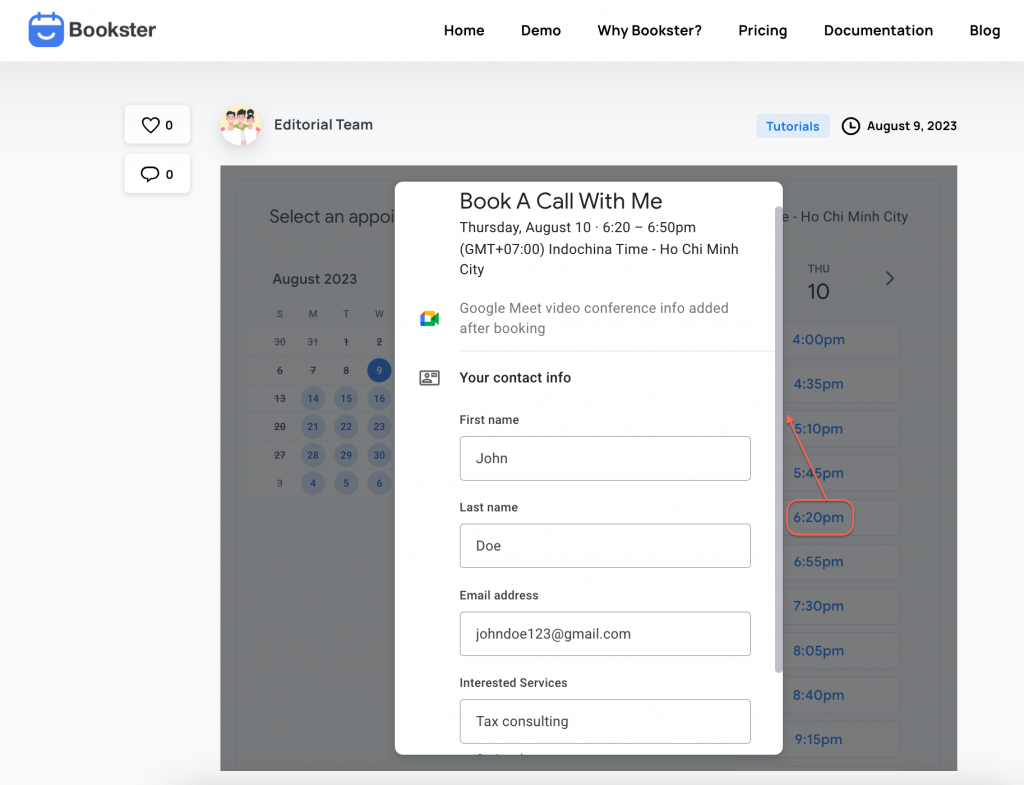
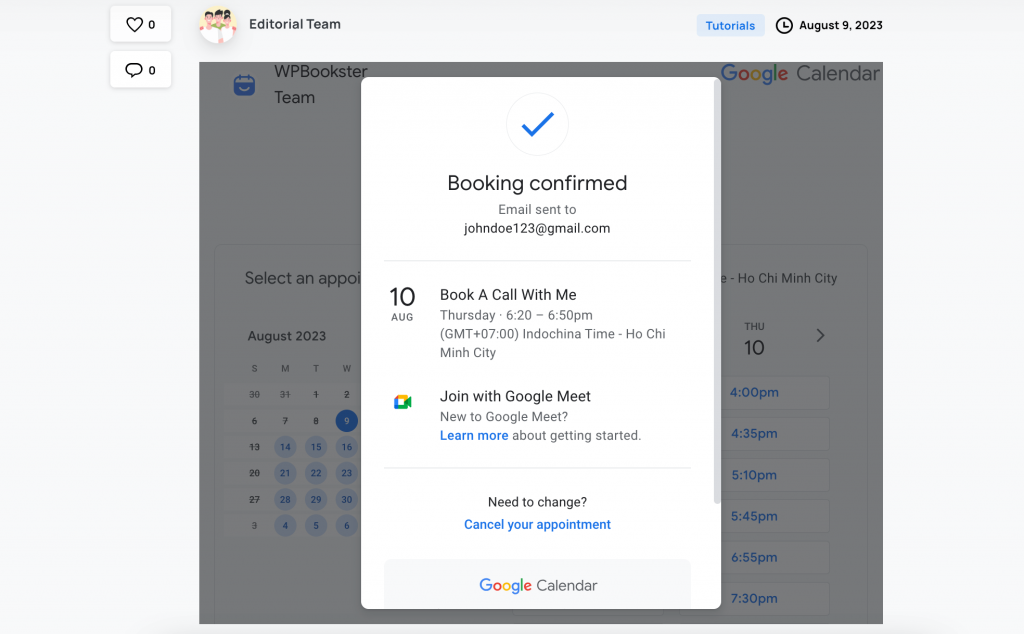
Once you’re ready, simply click on “Book” and a confirmation pop-up will appear.
If necessary, the person booking the appointment can cancel it from here.
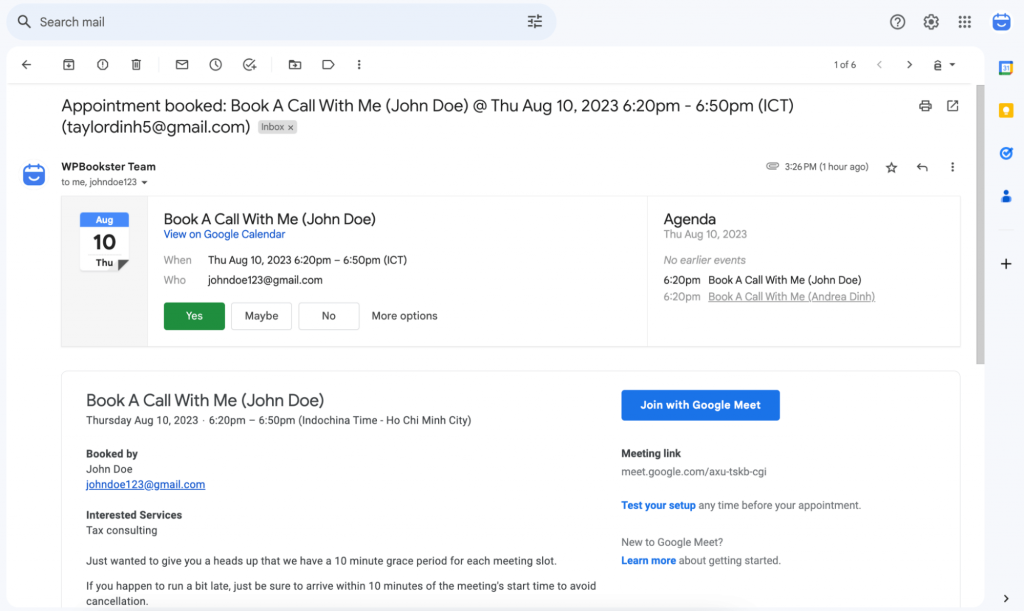
As promised, a confirmation email will be sent to both the person booking the meeting and you who set up the schedule. And the booking schedule will update automatically, so that time slot is no longer available.
But let’s say something unexpected comes up and you need to add an event to your calendar – no worries! Simply click to add the event and your availability schedule will automatically update. It’s super easy and convenient – your booking schedule will always be up-to-date.
FAQ – Adding Google Appointment Scheduling to WordPress
Is the Google booking schedule free?
If you’re using Google Calendar with a personal account, you can definitely create one booking page and receive unlimited appointments for free! However, if you’re interested in using more advanced features, you’ll need to have a Google Workspace or Google One subscription. Let us know if you have any other questions!
How do I add a booking calendar to my WordPress site?
There are a few ways to do it. You can direct users to an external booking website or embed a booking system like Google Calendar or Calenly into your website. Another effective way is to use a WordPress appointment booking plugin that allows you to customize the booking system to match your site’s design. If you have the budget, you can even develop a custom-coded booking system. Feel free to explore these options and see what works best for you.
How to modify Google appointment schedule on WordPress page?
If you need to change the settings of your Google appointment schedule on your WordPress page, it’s super easy! First, select the appointment schedule you want to modify and click on the pencil icon to edit. Once you’ve made your changes, just hit the save button and you’re good to go!
Summary
We hope the detailed steps on embedding a Google Calendar booking page to WordPress site were helpful for you. It’s a great way to manage your schedule and boost presales on your site.
Have you tried out Google Calendar appointment schedules or any other WordPress appointment booking plugin for your website? I’d love to hear how you’ve been using appointment pages on your website. Let me know in the comments below.

