Are you searching for a WordPress appointment plugin that allows your clients to book appointments online?
An online booking form offers a straightforward way to schedule appointments and is available 24/7, making it easy for potential customers to engage and boosting your revenue. A booking form on your WordPress site transforms the experience for both you and your customers.
This tutorial will guide you throug adding bookings manually on your WordPress site using the WPBookster plugin.
Table of Contents
Why Add a Booking Form to Your Online Store?
Adding bookings manually is an ideal for business owners or administrators who need to manage appointments directly from the WordPress dashboard. It’s perfect for situations where clients may book over the phone, via email, or in-person, and they want to keep everything organized in one place.
By manually adding bookings, administrators can ensure that all appointments are tracked, even those that aren’t made through the online booking form, giving them full control over their scheduling even if clients schedule appointments through phone, chat, or other channels rather than booking directly on the website, the admin or staff will need to add these appointments in the system’s backend.
We highly recommend using Brandy, a clean and lightweight WordPress theme, and WPBookster, a multi-purpose appointment WordPress plugin that will power all the hourly bookings and essential marketplace features.
Now, let’s move on to the tutorial section of this article and get started on creating your appointment booking website with WordPress!
Step to Add Booking Form using WPBookster
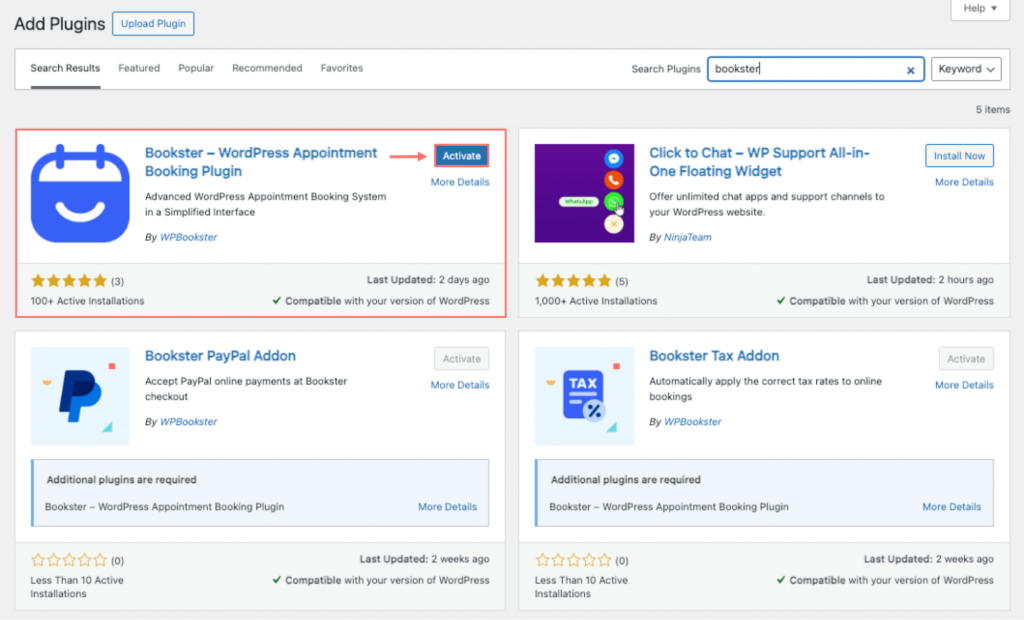
Step 1: Install the Plugin
Installing the WPBookster plugin is simple and easy, especially if you’re familiar with WordPress. The process follows the same basic steps as any other WordPress plugin.
Step 2: Plan Schedule for Your Services
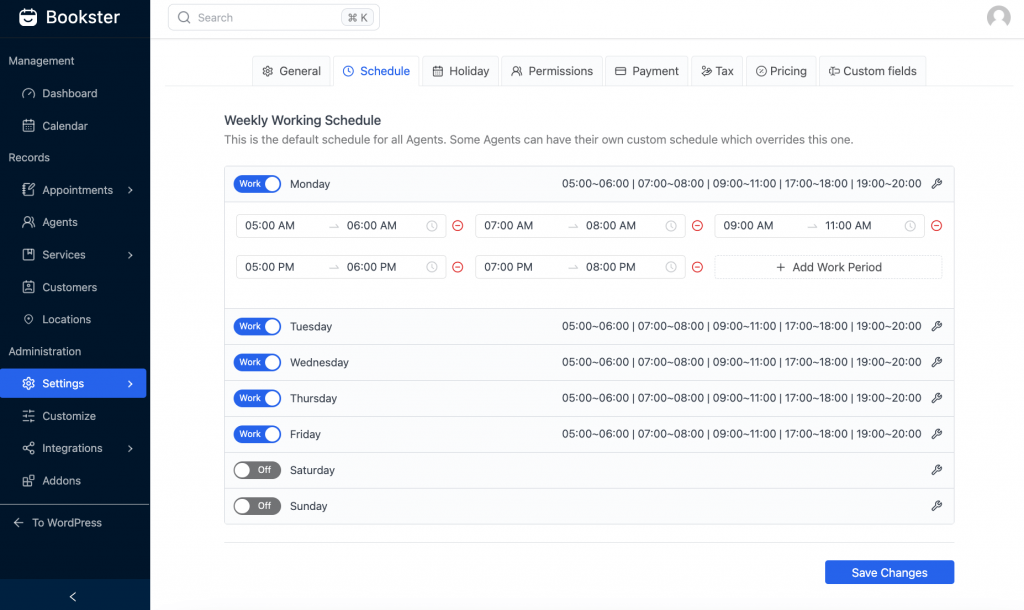
WPBookster simplifies scheduling by allowing you to customize work hours and designate days off for your team. You can easily adjust the regular schedule with varying working hours, specify particular days off, and even incorporate breaks throughout the day.
Step 3: Add Services
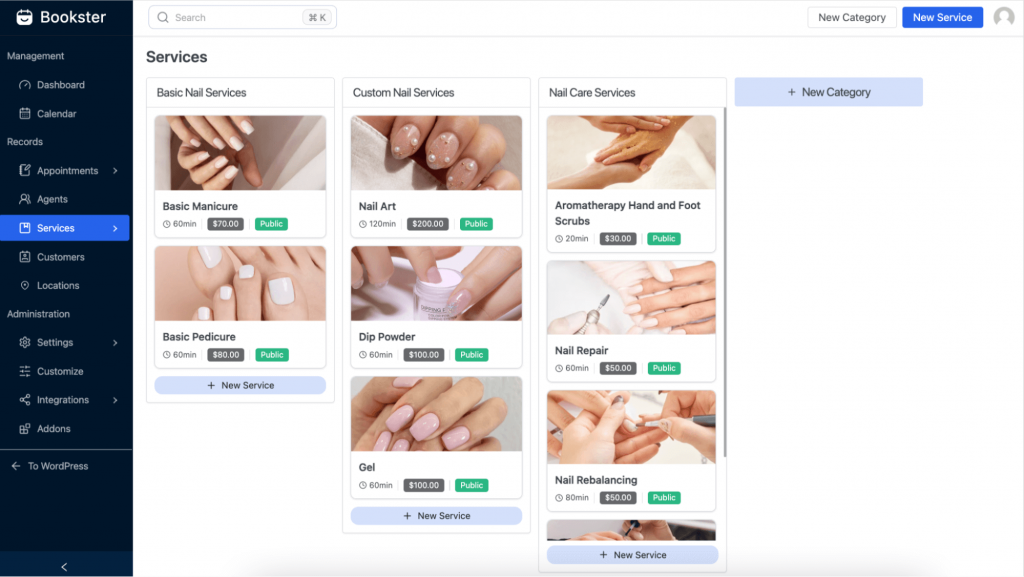
In the Bookster dashboard, you can easily add categories by clicking on Services, then selecting New Category. Enter the desired category name and click the Save button to finalize your changes.
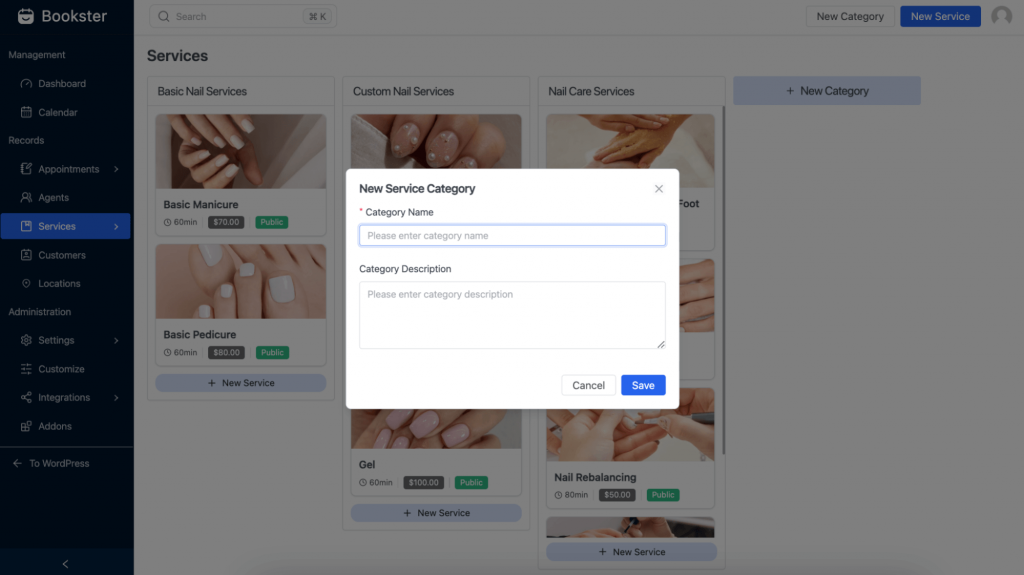
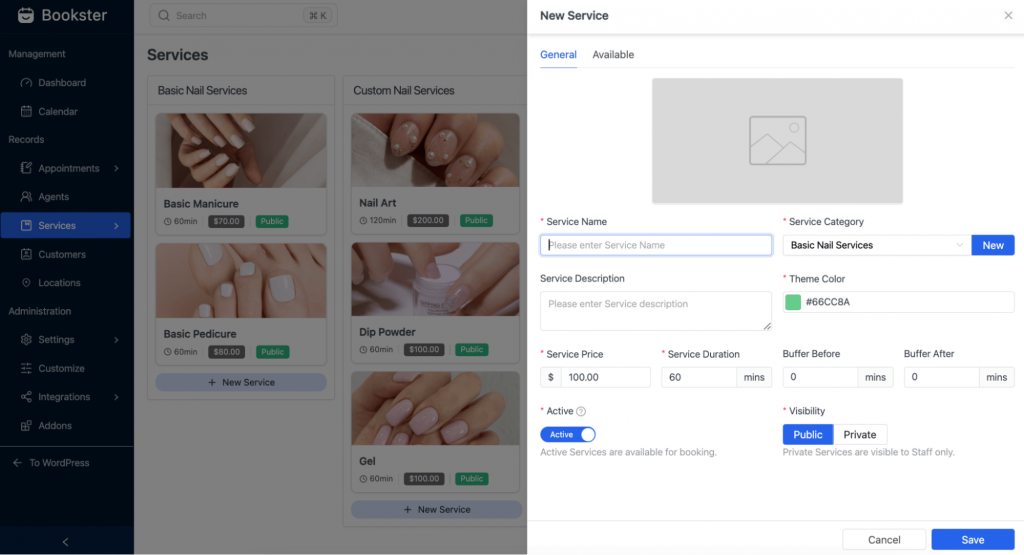
After creating a category, you can proceed to add a service by selecting the New Service button located in the top right corner of the screen.
Once you click the button, you will be prompted to provide the following information for the new service:
- Picture: Select an image that best represents the service.
- Service Name: Give the service a descriptive name that clearly identifies its purpose and distinguishes it from other offerings.
- Service Category: Select the category to which this service belongs from the available options.
- Service Price: Enter the price for one session of the service.
- Service Duration: Specify how long the session lasts
- Buffer Time: Set buffer times before and after the session to prevent overbooking.
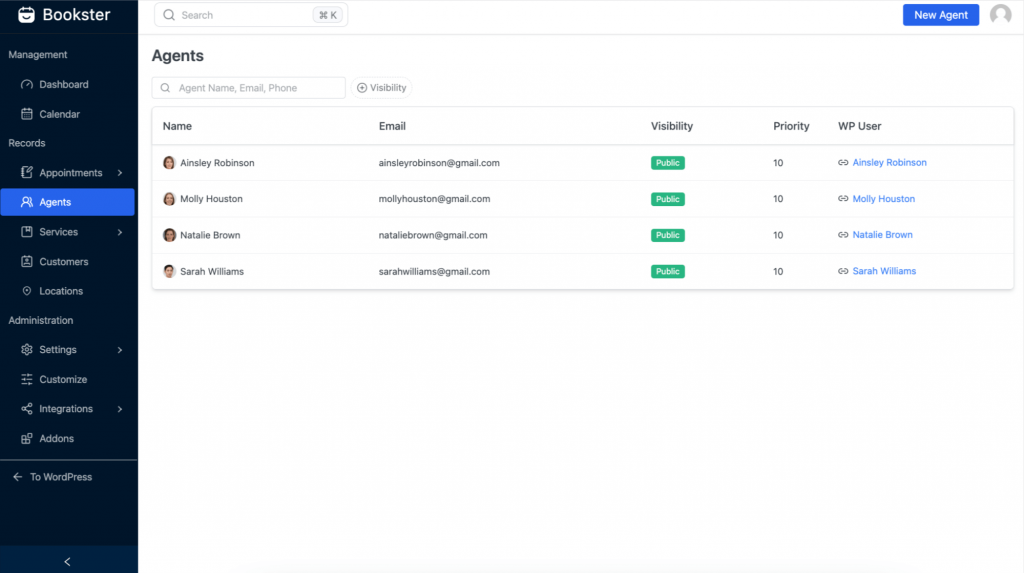
Step 4: Manage Agents
Next, begin adding employees through the form builder. Each employee can offer various services, display their unique work schedules, and customize their individual settings.
The first tab will prompt you to provide the following personal details about the employee. If you’re a solopreneur, you can also add yourself as an employee.
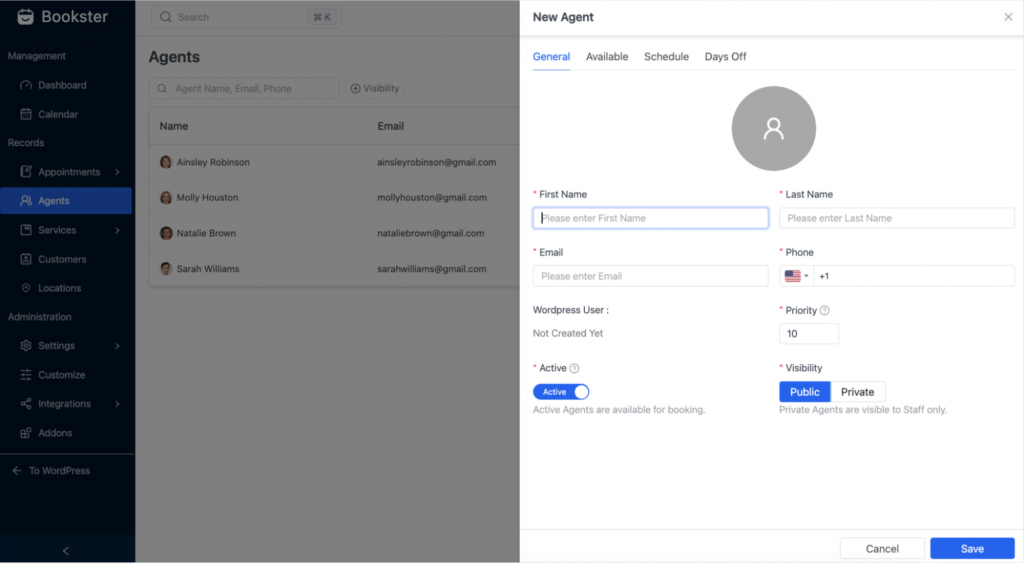
If you have multiple employees offering different services, you can add each of them to the plugin so they can receive and manage booking requests.
The second tab in the booking form builder lets you select the services offered by your employees. Navigate to this tab to identify which employee is responsible for each service. If you haven’t added the services yet, don’t worry; you can complete this step later.
The third tab allows employees to set their work schedules, while the fourth tab is designated for specifying days off.
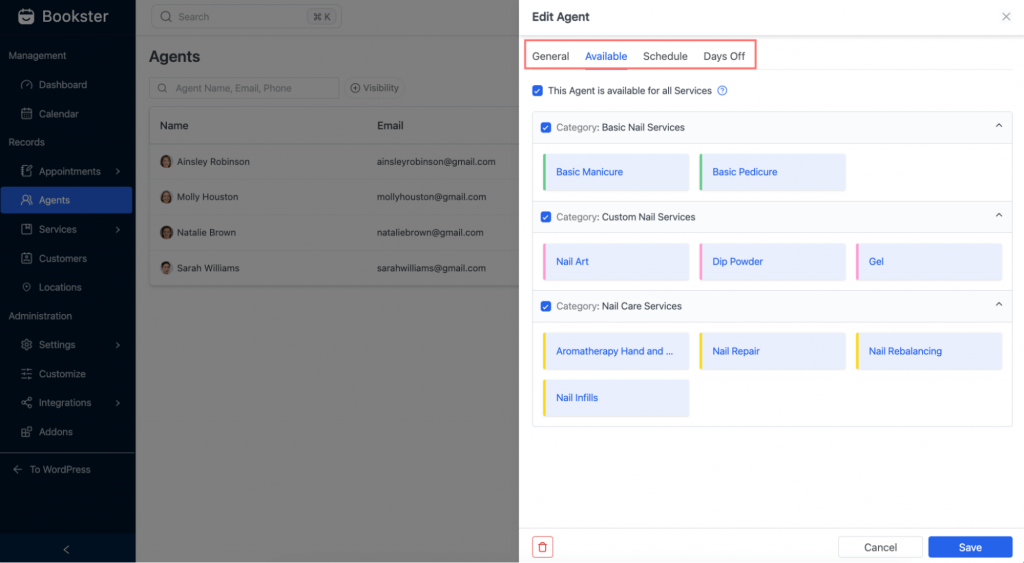
You can easily control the visibility of each agent by selecting from options such as public, private, or archived if needed.
Step 5: Customize Your Booking Calendar with Bookster’s addons
Bookster offers a variety of powerful addons designed to extend and enhance the capabilities of your online booking system. Each addon is crafted to address specific needs, from payment management, customization to advanced features like location and discount management.
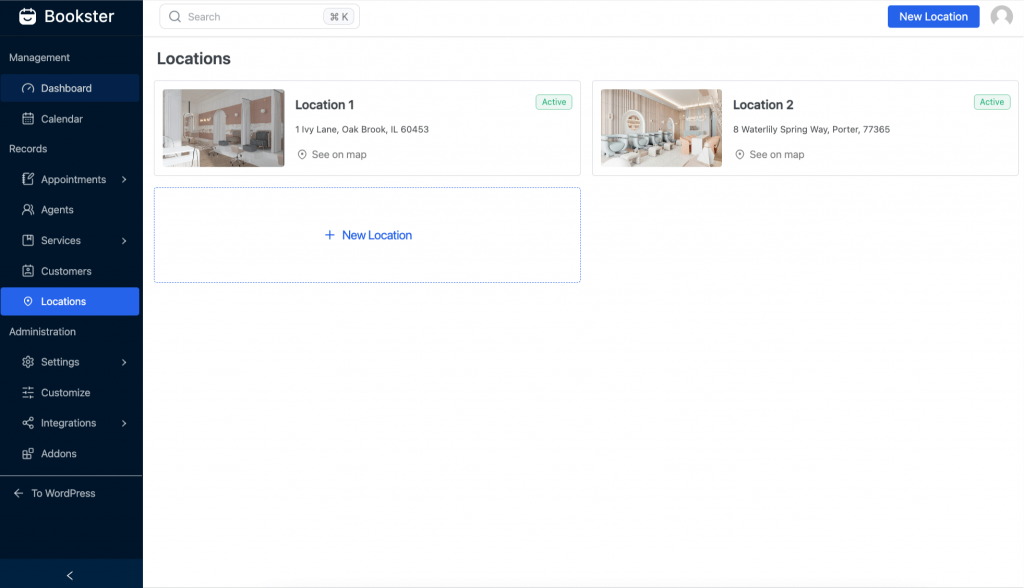
1. Locations
Specify the location for the service, especially if you have multiple locations. This helps customers identify where the service is offered and ensures accurate scheduling for that specific site.
2. Extra Options
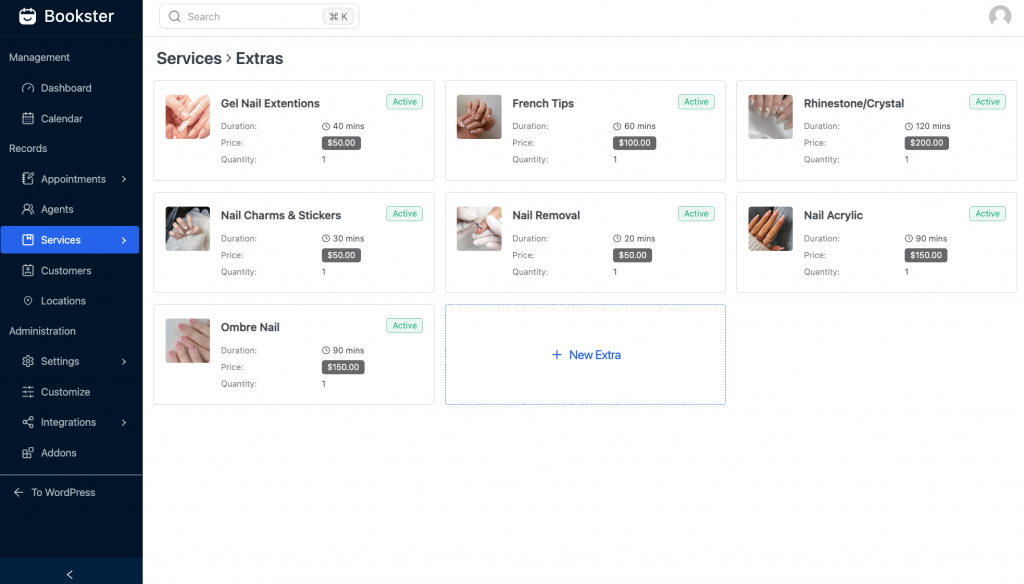
WPBookster allows you to add extra options (with additional fees) for each service. For example, if you own a spa, a customer selecting a massage service can choose an extra sauna session if they wish.
This add-on allows you to limit the quantity of extra options available for each service. For instance, if you’re offering a massage service with an add-on of a sauna session, you can set a limit on the number of sauna sessions available per day.
This feature enables clients to customize their experience while providing opportunities for upselling.
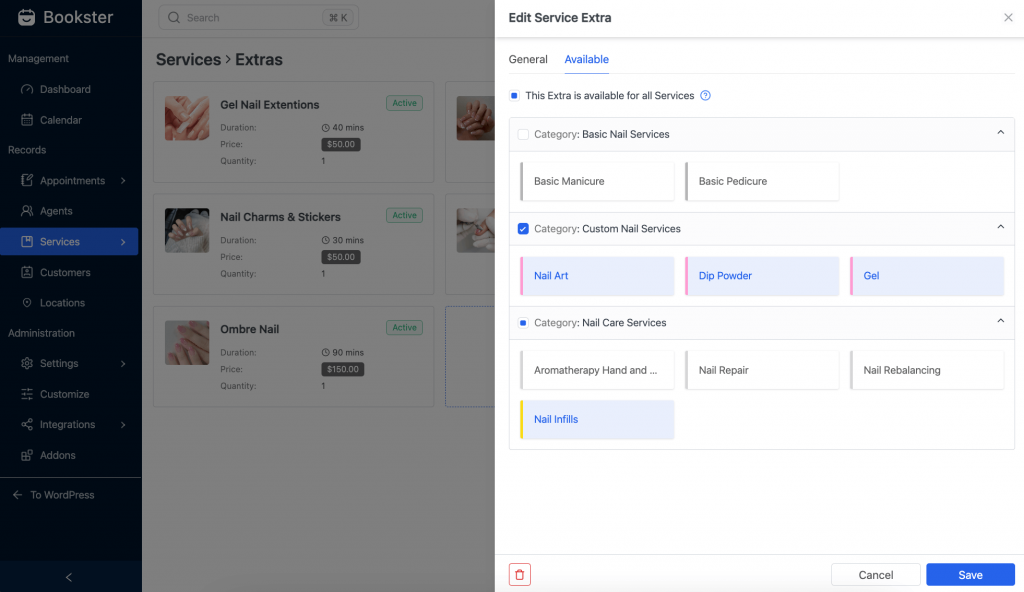
Bookster also let you to assign extra options to specific services.
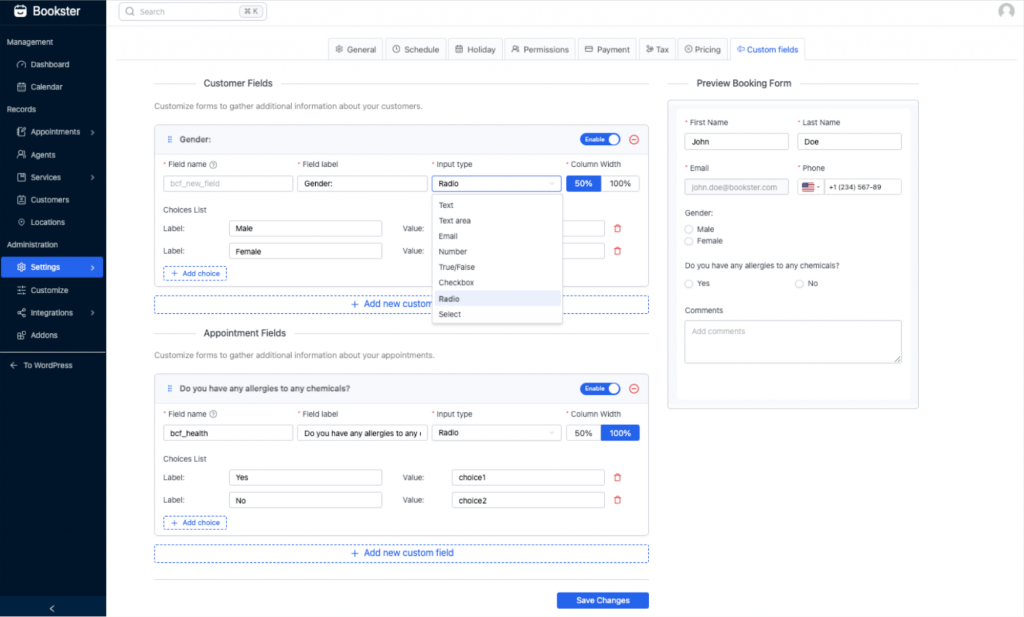
3. Custom Fields
Depending on the type of reservation, specific information is required on the booking form. Typically, a booking form will ask for personal details such as name, address, and phone number.
With WPBookster, you can easily add custom fields to gather specific info from your clients during the booking process.
For example, you can ask clients about their preferences or also collect important health info, such as allergies or any medical conditions that might be relevant.
You might even ask how they heard about you, which is great for figuring out what marketing efforts are working!
4. Taxation and Pricing
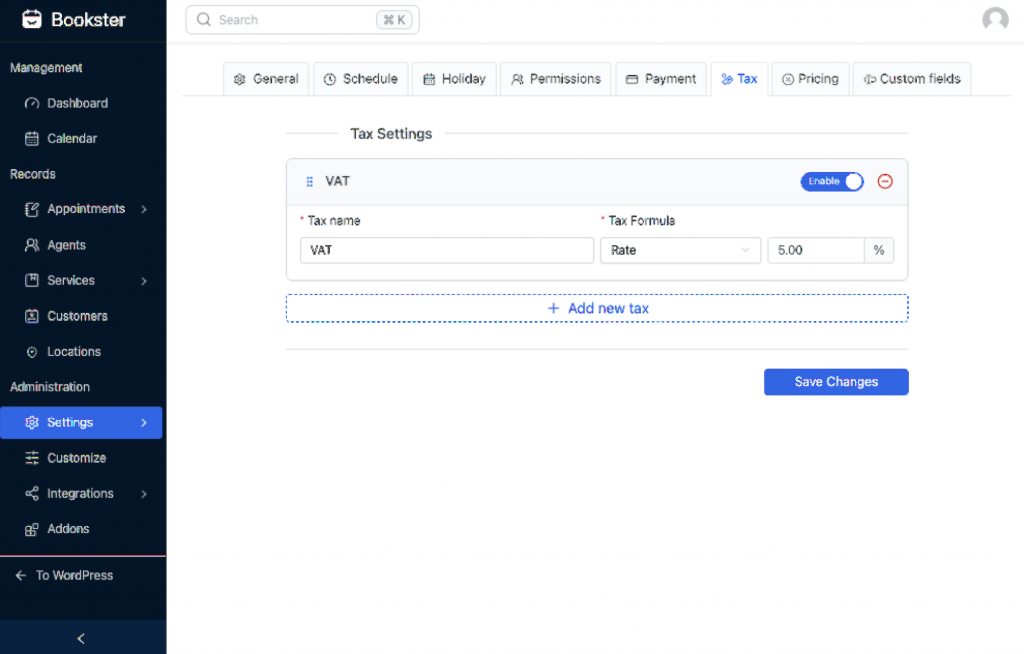
- Tax
This add-on makes it easy to manage your store’s tax settings. You can specify tax rates applicable to different services, ensuring compliance with local regulations.
Plus, you can easily include or exclude tax amounts in service prices, giving you flexibility in how you present costs to customers.
- Pricing
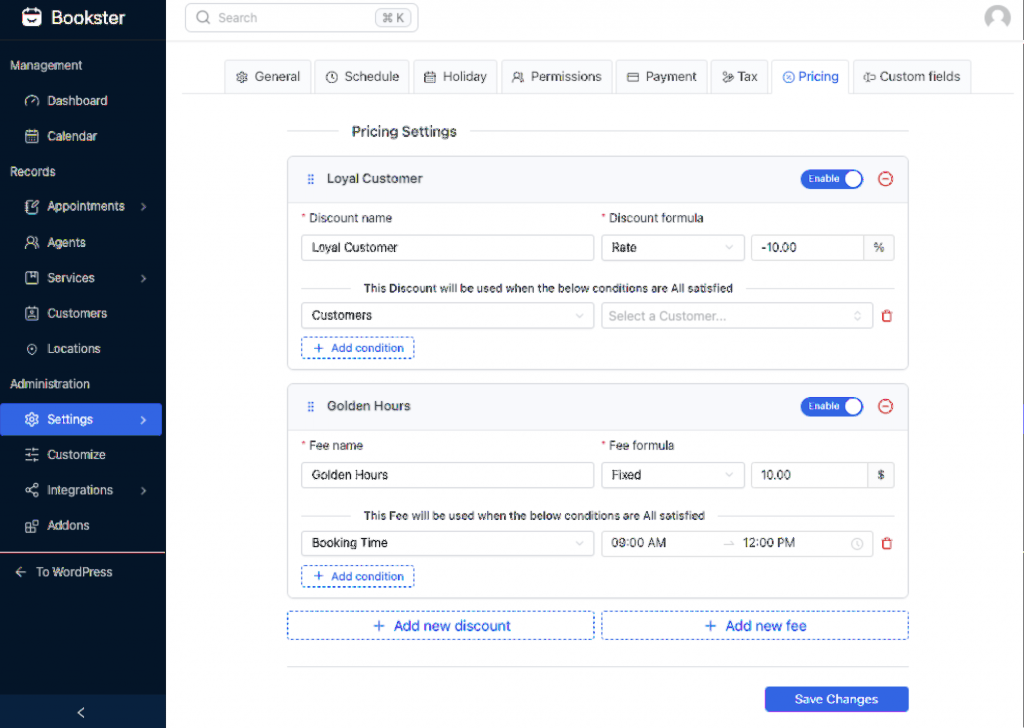
This Bookster add-on allows you to apply discounts and fees globally accross all service which is ideal for your marketing campaigns.
Whether you’re running a seasonal sale or a limited-time promotion, you can adjust pricing to fit your campaign strategies to drive more bookings.
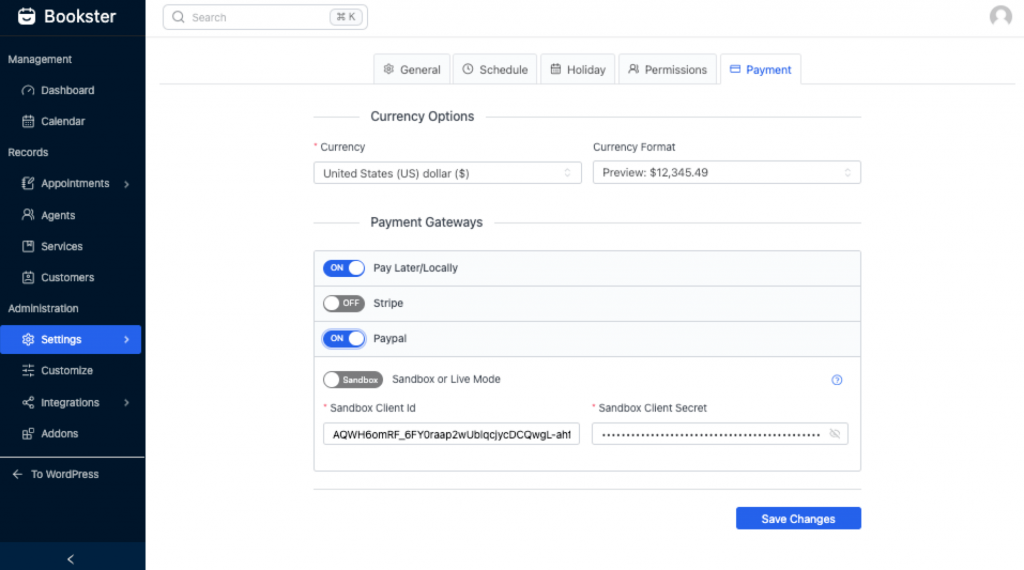
5. Payments
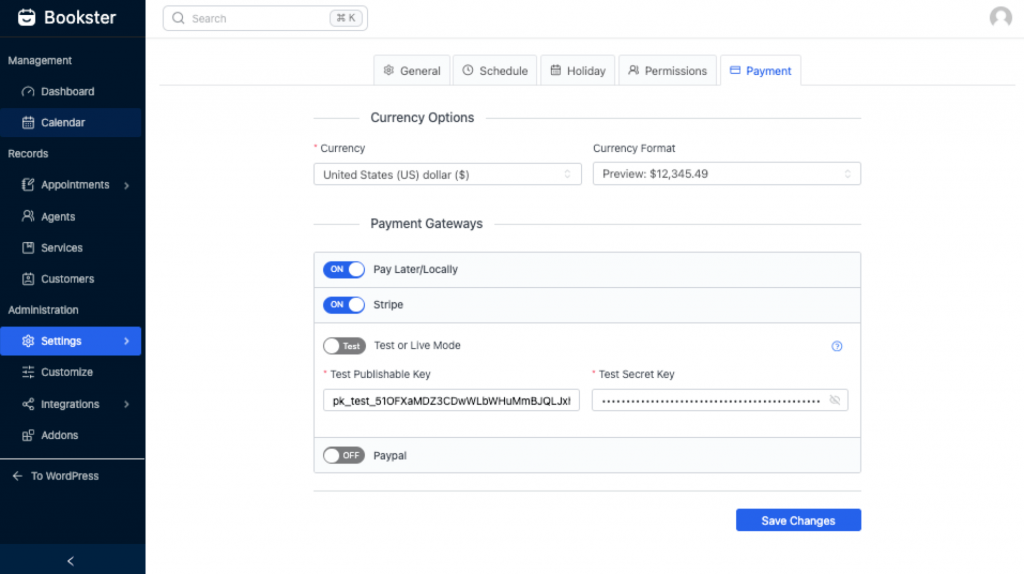
- Stripe
WPBookster works smoothly with Stripe, letting you accept secure online payments right through your booking system. With Stripe, it’s a fast, reliable way to offer your customers a trusted payment experience; you can handle credit and debit card payments, support multiple currencies, and even set up recurring payments for subscription services.
- Paypal
Besides Stripe, WPBookster also integrates with PayPal, giving your customers another secure and convenient way to pay. Your clients can use their credit or debit cards or pay directly from their PayPal account.
Step 6: Create Booking Form to Your Website’s Front-end
And you’re finding the way to add an online form to the front-end of your website to allow visitors to book appointments.
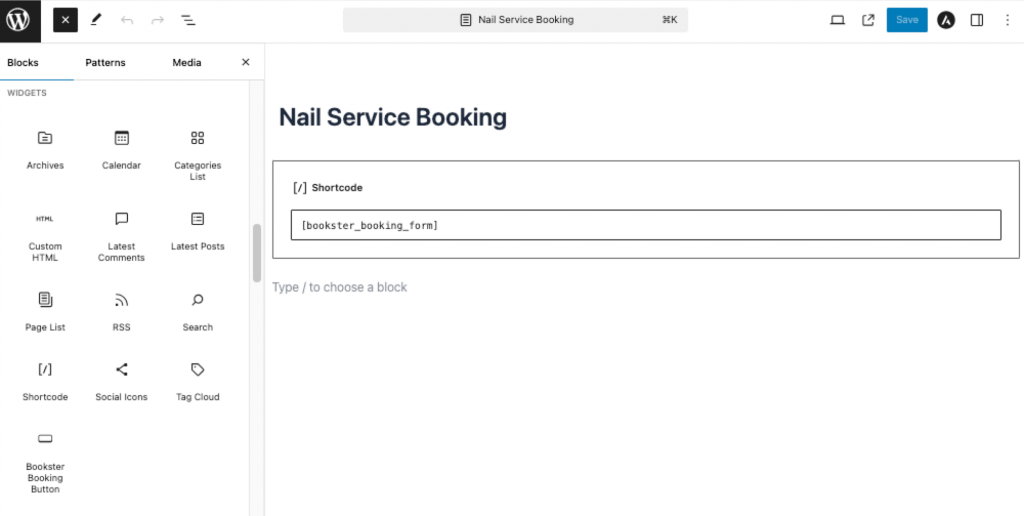
In the WordPress admin panel, navigate to Pages or Posts, then click on Add New. Enter a name for the new post or page to get started.
Simply go to the page where you want to include the form, search for the Shortcode block in the left toolbar, and paste the shortcode [bookster_booking_forms]. Once done, click Save/Publish to finish the process.

The second way to allow your customers to book your services on your website is through the Bookster booking button.


Let’s Add Bookings Manually with Bookster
Some clients may choose to book appointments through phone, chat, or in person rather than using the online system. Additionally, there are times when clients request changes to existing bookings, such as adjusting the time or selecting a different service.
Staff can manually update these appointments to keep the schedule accurate and up-to-date. You just need to follow this part to add a booking manually in one minute.
In the Bookster dashboard, look for New Appointment button and click on it.
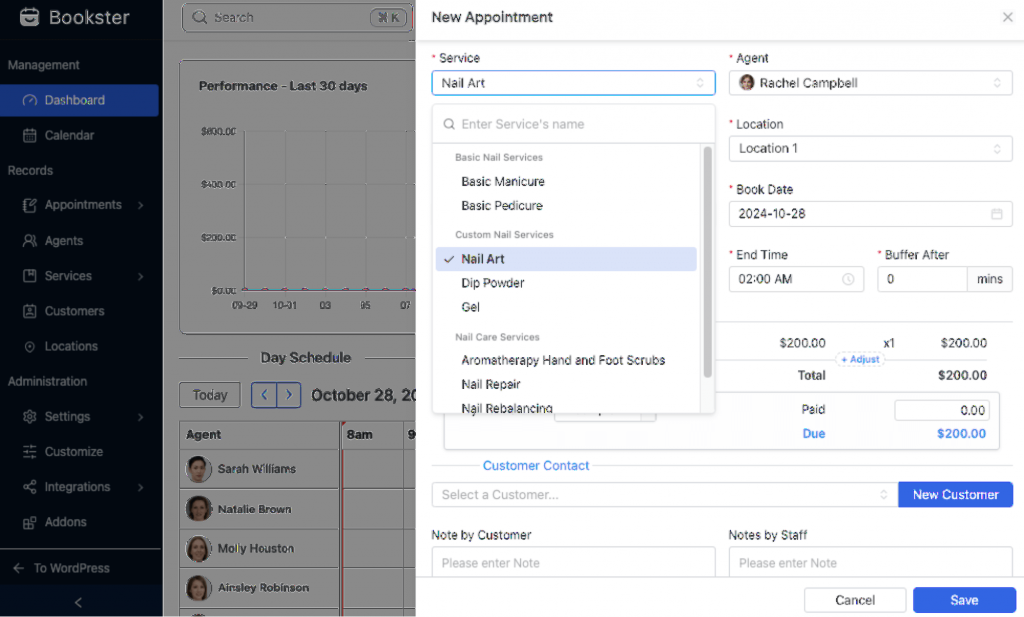
At this point, simply select the service and service extras that your customer wants to book. Then, fill in any other required details, like the date and time of the appointment, client contact information, and any special notes.
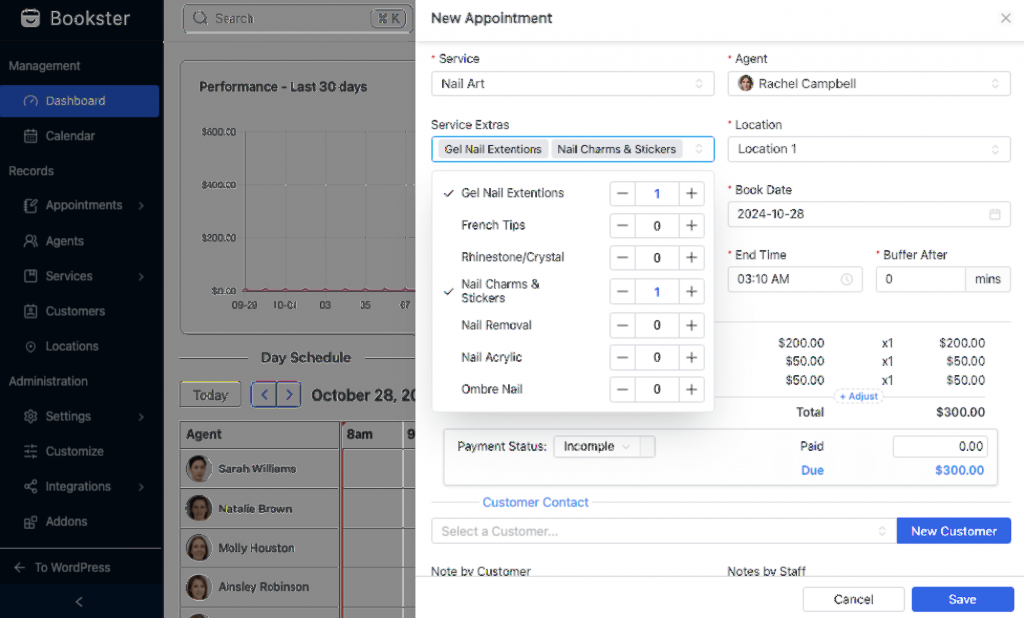
Easily provide quotes, adjust prices, manage payments, and assign an agent and location. If it’s a new customer, you can also add them to the database for future reference.
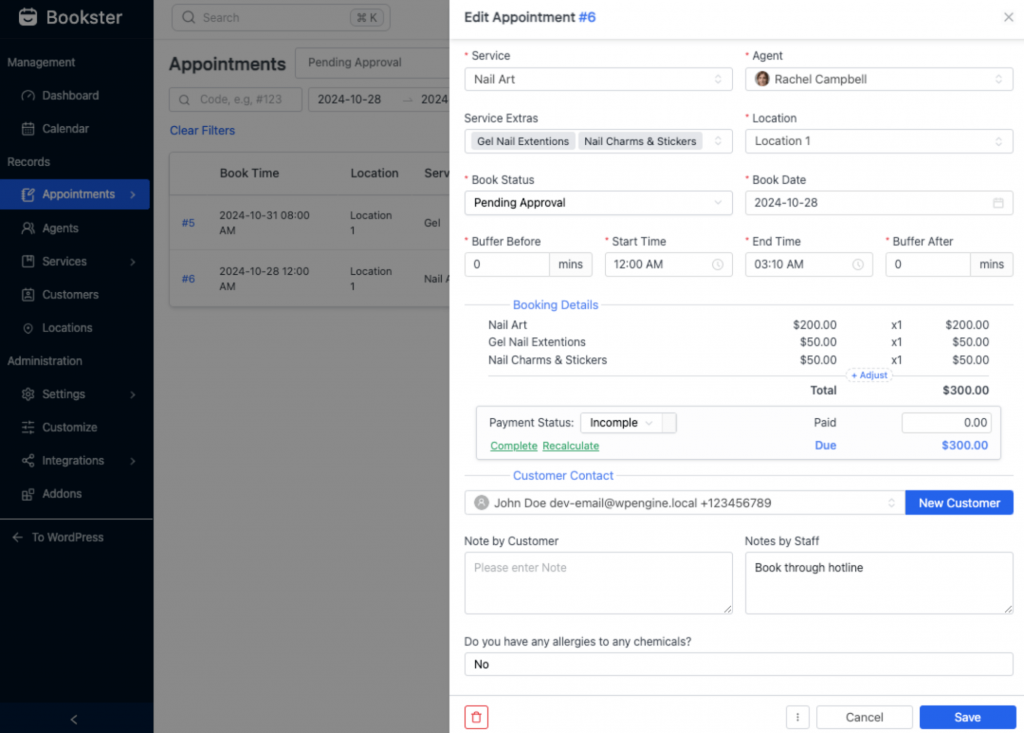
Once all the information is added, save the booking to confirm it in the system. This ensures that all appointments, even those taken outside of the online platform, are correctly logged and easily accessible.
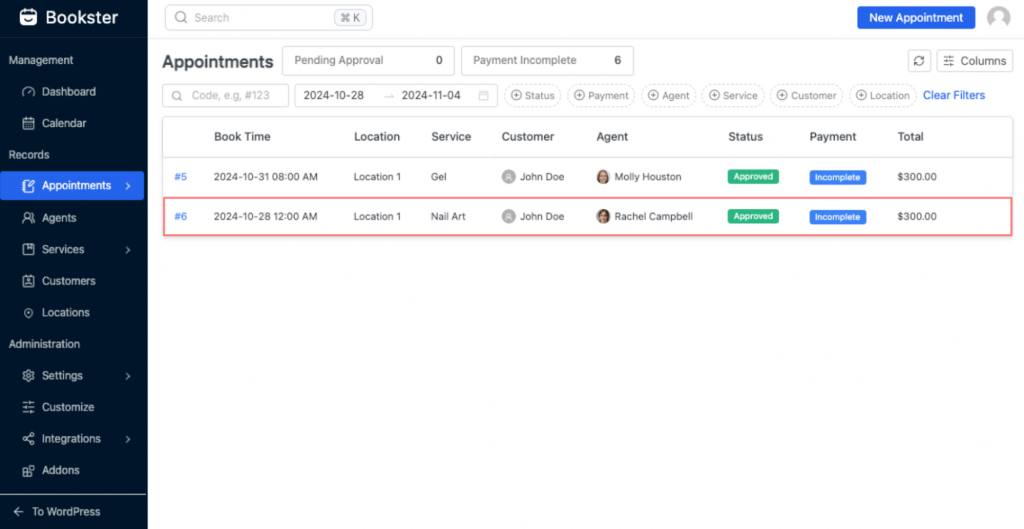
To Wrap Up
As you can see, Bookster is incredibly user-friendly. You can easily create a booking request form, schedule appointments, and accept payments online with minimal effort.
Bookster stands out as one of the best booking plugins for users with limited technical experience due to its straightforward setup and ease of use. At the same time, it offers advanced booking features and full customization options for developers.
We hope this article helps you feel more confident in setting up your online store. You may also want to check out those top Bookster alternatives and subscribe to our YouTube channel so you don’t miss the latest WordPress tutorial videos.
And from now on, do you want to increase your booking? Try Bookster now.

